Tuesday, February 4, 2014

My Version of Valentine's Crafting...

The people closest to me know that I love to switch up our home decor quite often.  I use different seasons and holidays as my excuse to swap patterns, colors and textures in and out of our space all year long.  But shockingly, that doesn't mean I go all out for every holiday on the calendar.  One of the holidays I've never decorated for is Valentine's Day.  And while I'm still not going all out...thanks to a super sweet invite to a blog hop full of talented ladies, I've decided to try my hand at a little Valentine's Day crafting! :)

14 VALENTINE'S DAY  PROJECTS

For my project, I wanted to make some art to add a little "love" to our mantel.  I went shopping in my crap craft room {one of the few times I've been thankful for my hoarded stash taking up an entire room} and gathered my supplies: empty frames, cardstock, a heart-shaped lever punch, glue, ruler and x-acto knife.


I know my color scheme doesn't scream Valentine's Day, but it fits perfectly in our home and I wanted to prove to myself I could make something Valentine's-ish without using pink and red.

I started by cutting out my backgrounds.  I used the filler paper that came with the frames as templates, and cut clean lines with my ruler and x-acto knife. {Please ignore my much-in-need-of-a-manicure-nails.}


Then I started punching holes...errrr, hearts.


I lined things up as I punched along so I could get an idea of how many I'd need.


When I had enough hearts cut out, I laid everything into place.  Then I got out the trusty Elmer's to glue each heart down, one by one.  


The key is to not put a ton of glue on the back...just a dab.  And since you have the grid already laid out, you can slide the hearts around until the placement looks right.  I didn't measure anything for this project.  In fact, that was my requirement.  I didn't want to measure anything! ;)

After the first grid was done, I decided to use my next frame to write out an X and O.  Again, I just eyeballed the placement, and glued after I laid everything in place.


Once the glue dried, it was time to pop them into their frames, and voilĂ !  Instant Valentine's Day art for our mantel! :)


Now, before you go, please make sure you enter to win a $140 Target gift card and check out the 13 other amazing Valentine's Day projects!!  You won't want to miss any of them! :)

Target gift card giveaway a Rafflecopter giveaway Valentine's Day Projects 1
Valentine's Day Projects 4
Valentine's Day Projects 2
Valentine's Day Projects3

Thursday, January 2, 2014

Puttin' It Out There.

Happy New Year everyone!!  I hope you guys had a few wonderful weeks celebrating the holidays...I know I did.  It was filled with friends and family, and we certainly made some wonderful memories.

For most people, the new year is a time to hit the reset button and start over.  As clichĂ© as it sounds, I’m joining everyone and doing just that.  I’m starting my second round of Whole30I had such wonderful results after the first time, that I knew I’d be dying to take on the challenge again...especially after a ton of indulging over the holidays.

Everyone’s Whole30 journey is different.  Most people ask me if I do it for the weight-loss aspect, and I’ll be 100% honest...that’s just not why I did it the first time around.  {But boy was it a fantastic perk...}

I took on the challenge of changing my eating habits purely for health purposes.  I’ve been struggling for quite a long time with health stuff, but of course, you never see that here on the blog.  Sure, I have no problem keepin’ it real with you guys and letting you know that our home is nowhere near perfect or styled like a magazine.  It’s a home.  We live in it.  Yes, we tackle things every day to make it the prettiest and most functional it can be, but come on.  Most of the time it’s a mess because of the 45 projects I've started, but not yet finished.  Our guest room is so crammed full of to-be-projects and other junk that you can’t even walk into the room.  {One of my goals for this year is to get our house purged, organized, and finish projects before I take on something new...which, I admit, is tough for this girl who is constantly dreaming up new things.}

But, I digress…back to the health stuff.  It’s hard to get so personal for all the world to read, but I’m hoping I can help at least one other person who may be struggling.  If I can touch one person, then my job is done…so here goes nothing!!

In short, I hated to talk about it.  In fact, it took me a super long time to talk about things with my hubby, who is my bestest friend ever.  Before I opened up to him, I pretty much just confided in my parents because, well, they made me, so they can’t think less of me!!  I used to think people would judge.  Don’t get me wrong...some do, but not everyone.  And one day, I heard someone else open up about their struggle.  It moved me so much that I literally burst into tears.  Her words were my words.  I felt like she was speaking for me.  She was going through the exact same thing as me, and from then on, I didn't feel so alone anymore. I became more confident in my own struggle because she vocalized hers.  She has no idea how much she helped me by courageously telling her own story, so this is my own version of trying to pay it forward.

Here is the {not-so} condensed version of what went wrong….

Growing up was great…I was healthy and social and all was right with the world (or as right as a girl’s world can be while going through middle and high school...am.i.right?).  But then I got into college and things started to change.  I battled a nasty parasite for well over a year and had some suuuuper stressful relationships {putting it lightly}.  Then when I graduated, my parents moved 12 hours away.  For some, that may not have been a big deal, but my parents are my best friends.  It was a huge adjustment for me, and simultaneously, I bought my first place and started a stressful "big girl" job that involved more commuting than any person should have to deal with.

Notice a theme there?  STRESS.  After years and years of chronic stress…I broke.  I remember the month things really changed, and it was of course, smack in the middle of my busy season.  I started getting awful dizzy spells, which really scare the heck out of someone who drives 3+ hours a day.  I began getting sick after every meal I ate.  My heart started having funny rhythms.  Basically everything was just off, and I broke down.  I started having major anxiety from all of these things happening and I began to see every type of doctor under the sun.  I’m pretty sure most looked at me like I was crazy.  They just wanted to write me an Rx for Xanax and send me on my way.  But something physically wasn't right.  I knew me, and I knew it wasn't just in my head {no matter how many people and doctors wanted to tell me differently}.

Fast-forward a few years, and my symptoms hadn't changed much.  Anxiety had become the norm for me, and it completely warped my social life because, ummm, hello…I was terrified I’d go out and get sick in unfamiliar territory.  I just wanted to hang home in my safe zone, with people who I was comfortable with.  I can’t even explain how sick and tired I was of feeling sick and tired.  I. Was. Not. Myself.  Something had to be wrong, even if no one else was seeing it. 

Finally, my life started to change when my mom looked into alternative doctors who deal with thyroid, adrenal, etc. conditions.  She herself was having some issues, and was going to see a doctor recommended by the Broda O. Barnes Research Foundation, and told me I should get their doctor list and find one near me.

I did just that, and have been thanking God for it every day.  My new doctor (Dr. Michael Doyle) is the first doctor who has looked at me as a whole, and ran extensive tests to get to the bottom of things.  He looks at numbers differently than most doctors and examined things others wouldn't even think to look at.  He found that I am hypothyroid and have adrenal insufficiency {hello major stress and anxiety}…I also had such low iron and magnesium.  With his guidance and NATURAL treatments, I have started to feel like myself again.  I truly believe he has given me my life back, and in the quest to continue my journey of health, I started looking into food for healthy thyroid function and stumbled onto the book “It Starts With Food”.  The book was so interesting and informative, and confirmed my suspicions that the Whole30 challenge was right for me.

After my first Whole30 experience, the system-wide inflammation marker that came up in my first few blood tests with Dr. Doyle, was completely normal.  The constant bloat, problematic skin, low energy, ravenous-sugar-cravings, elevated anxiety, trouble sleeping...all improved or disappeared.  Through proper treatment and nutrition, I've regained so much!!

2013 was a wonderful year where I began my journey to become healthy again, and I’m continuing that into 2014!!  So basically {if you are even still reading} this is why I’m taking on the Whole30 challenge again.  I want to feel as good as possible, and that starts with the food that I put into my body.  So today is Day 1…here’s to the next 29!!


And since I’m getting all personal on the blog today, I just want to thank all of you for letting me share my story!  And a major thank you to my hubby, parents and friends for all the support you give me every single day.  You guys make life pretty darn amazing!! Xo! :)

Monday, December 30, 2013

Lucite Curtain Rods..& A Question.

Raise your hand if you noticed my curtains were ready for a flood when I showed off our Christmas home tour.  Come on...admit it.  I know plenty of you were asking yourself what the heck I must have been doing when I hemmed my curtains.  But for the few of you who are kindly pretending like you didn't see them floating a good 8 inches off the floor in some photos, here's a lovely reminder.


And to answer the question in your head...no, I didn't do this intentionally.  In fact, if you remember when I showed off my DIY striped curtains last year, they were the perfect length that just slightly pooled onto our dark hardwoods.


Did I shrink them?  Nope.  I finally found the perfect curtain rods for our home, so our curtains can be hung where they should have been from day one...high and wide!!

When we first moved in, I wasn't sure what kind of curtain rod I wanted to get for our living/dining room area since the window width to cover was so long. To keep the price, work and wall damage minimal, I found inexpensive rods from Amazon and used these Kwik Hang rod supports as a placeholder. They went up quickly, and added a much needed softness to the space.


Two things bothered me about the set up.  The curtains were hung low {a major decorating no-no} and the rod and middle support were not pleasing to my eye...especially since we never use curtain to cover the windows.  I lived with things as they were for almost two years while I brainstormed what I wanted.  One day, it finally hit me and I was no longer afraid to drill something permanently into our delicate plaster walls...eeeeek!

It was lucite rods for the win!!  I thought they'd be beautiful in our home.  And I was hoping I'd be able to save a bit of money since I didn't need a rod that would span the entire width of windows...two smaller rods hung wide at the ends of the windows would work just fine, and get rid of some of the visual clutter.

I hopped onto the Internet and searched my little heart out.

As I predicted, lucite {or acrylic} rods can be quite expensive...especially when they are sold as curtain rods.  So instead of looking for home decor suppliers, I turned my efforts to finding plastic manufacturers who could make rods that I could cut-to-size myself.  The prices for the rods themselves were reasonable, but the shipping costs were out of control.  Thankfully, I came across a manufacturer who is semi-local {about a 30 minute drive}, who would make the rods, cut them to size, and allow me to pick them up.  I couldn't get my exact measurements and place my order fast enough!

Once that was completed, I was on the hunt to find the perfect curtain drapery rings and mounting hardware to go with the rods.  It didn't take long for me to come across just what I wanted on Ebay.  Sold!!!

After hubby picked up our rods and the hardware arrived, it was time to turn my vision into a reality.  Admittedly, I put this off for many weeks.  Drilling into plaster, making sure the rods are level, blah, blah...it's just not my jam.  I'd rather do many things besides installing curtain rods, but hubby and I got our bedroom done in one night and our great room done another.  I'm SO happy we bit the bullet and got them up!

So basically, {if you are still reading this...gold star for you!}, this was my very long-winded way to tell you about my awesome lucite curtain rods and now-too-short-curtains. :)


Do you like?!  I loooooove.  I could definitely use more lucite in my life in 2014.

Speaking of which....can you believe the new year is almost here?!  I can't!!  December passed in the blink of an eye, and now I'm scrambling to get the blog prepped for the new year.  Is there anything you guys would like to see/hear more of?  Or less of?  Let me know!  I'd love to get some input from you guys. :)

Happy Last Monday of the Year!!!

Tuesday, December 24, 2013

Have Yourself...

...a merry little Christmas!  I hope you all have a wonderful holiday filled with loving family and friends!  I just wanted to take a minute and tell you guys how thankful I am for each and every one of you!  The fact that you take time out of your day to pop into my little corner of the blog-o-sphere means the world to me!!

So from our house to yours, Merry Christmas and Happy New Year!!  I'll see you in 2014! :)


Oh, and I surely couldn't let the holiday pass without sharing hubby's fab lighting skills!  He made our house perfectly festive. :)


Isn't he the best?!?! ;)

Monday, December 23, 2013

Search is Restored!!!

Hi friends!  I just wanted to pop in and let you know that the search feature in my sidebar is FINALLY working again!  The one I had there has been giving me trouble for entirely too long, so I figured out a replacement and so far so good!  Please let me know if this one goes crazy and stops working too!

Happy Christmas Eve Eve!! ;)

Friday, December 20, 2013

DIY Christmas Wreath.

I have been a crafting machine this Christmas season!  The Blogger Stylin' Home Tour totally lit a fire under me and had me churning out projects left and right!  Okay, that might be a slight exaggeration, but it definitely upped my productivity this month.

One of my favorite things I made was my Christmas wreath.  I used my holiday inspiration pretty literally in this project.


I started with a blank wreath form and some wide B&W striped ribbon.


I hot glued my black and white striped ribbon into place, and then tightly wrapped the ribbon around the form until I was back at my starting point.  I cut the ribbon and used another bead of hot glue to secure the end into place.


Then I used two different sized sparkly beads I had in my craft stash to create a cluster on the wrapped form.  These beads were pretty heavy, so I held each in place until the hot glue was 100% dry.


Once the cluster was big enough for my liking, I added some greenery using two small pieces from an artificial pine tree stem.  Then I just cut a sliver of leftover plaid fabric and pulled the loose strings off to give it a little worn, rustic vibe.  I tucked the ends of the plaid fabric behind the mirror on our mantel, using the weight of the mirror to hold the wreath in place.


I really love the combo of black and white stripes and plaid in this wreath.  Plus, it's got a bit of shine to it, and if you've been here for a while, you know I looooove me some shiny stuff!!  This is the third wreath I've made for our mantel {here was the first and second} and I love them more and more each time!

Happy Friday! :):)

Thursday, December 19, 2013

A Confession.

This Christmas season has been a total whirlwind for me.  Our weekdays and weekends have been jam packed, leaving little time for certain items on my to-do list.  One of those things that still isn't done...our Christmas cards.  I mean, I completed part of the job.  I personalized a design from Minted, placed my order and it arrived on our doorstep Tuesday.  Now I need to find the time to address and send them out. People may get our cards on Christmas, or even the day after, but I am determined to get them out.  You hear me?  D-e-t-e-r-m-i-n-e-d.

Ahhhh, now that I've got that off my chest, I'll leave you with some time to browse Minted's fabulous website.  It's seriously amazing.  {I was not compensated to endorse Minted.  They have absolutely no idea who I am.  I just love their stuff and wanted to share with you guys!!}


PS-Perny really needs to pull his weight around our household.  Maybe I should teach him how to address cards so he can help me out instead of doing this all day, every day....


He's lucky he's cute. ;)

Anyone else feeling overwhelmed with to-do lists lately?! Tis' the season!!

Wednesday, December 18, 2013

Jingle Mingle - DIY Monogram Stocking Ornaments

Anyone a fan of jingle bells?!  I know I am.  They're metallic.  They're shiny.  They make a joyful little noise.  I mean...what's not to love?  You know what else I love?  Coming up with fun Christmas crafts.  So when I was asked to participate in a jingle mingle with these fine ladies {Cuckoo4DesignShift Ctrl Alt, Nalle's HousePrimitive & ProperDwellings by Devore, and Bliss at Home}, I knew I couldn't resist!


No joke, after I got the invite for this fun series, I couldn't stop myself from using jingle bells everywhere! They were the perfect DIY addition to my Christmas home tour.

I used some to create cute little wreaths that adorn that back of our bar stools.


I also made a simple mistletoe to hang over our kitchen sink.


I even decorated my gift bags for a super fun ornament exchange night with friends!


We got to wear pj's and eat lots of yummy breakfast food for dinner.  {You need some cooking inspiration...here is who was in charge!  Check her out.  She rocks.}  It was basically a perfectly festive night. ;)


Anywho, I digress....

Back to the jingle bell project that started it all...my DIY monogram stocking ornaments! :)  They were super simple to make, and added a nice touch to our Tar-jay fur stockings.

I started with plain white MDF letters I purchased at Michael's...a "G" for me and a "P" for hubby.


White just wouldn't do it for me, so I busted out my trusty gold spray paint.  Once the letters were dry, it was time to add some ribbon and jingle bells!


First I added a loop of ribbon to the top of the "G", making sure it had enough slack to hang low on the stocking.  I used a thumb tack to secure my ribbon to the back of the MDF letter.


After that, I strung ribbon through the two different types of jingle bells {that I also I picked up from Michael's}.  I tied a knot at the end of each bell and cut the ribbon long enough so I could play around with what length would work best. Once I found out the right arrangement of the bells, I simply used another thumbtack to hold the ribbon in place on the back of the letter and trimmed the excess ribbon.


I repeated the same process for the "P".


Then it was time to hang and enjoy!!  In 10-15 minutes I was able to easily dress up our formerly-bare stockings.


I absolutely love the pop of gold on top of the fur texture!  Would any of you ever tackle this easy DIY?!

Don't forget to mingle on over to Cuckoo4DesignShift Ctrl Alt, Nalle's HousePrimitive & ProperDwellings by Devore, and Bliss at Home to see what projects they came up with! :)


Linking up to:

Monday, December 16, 2013

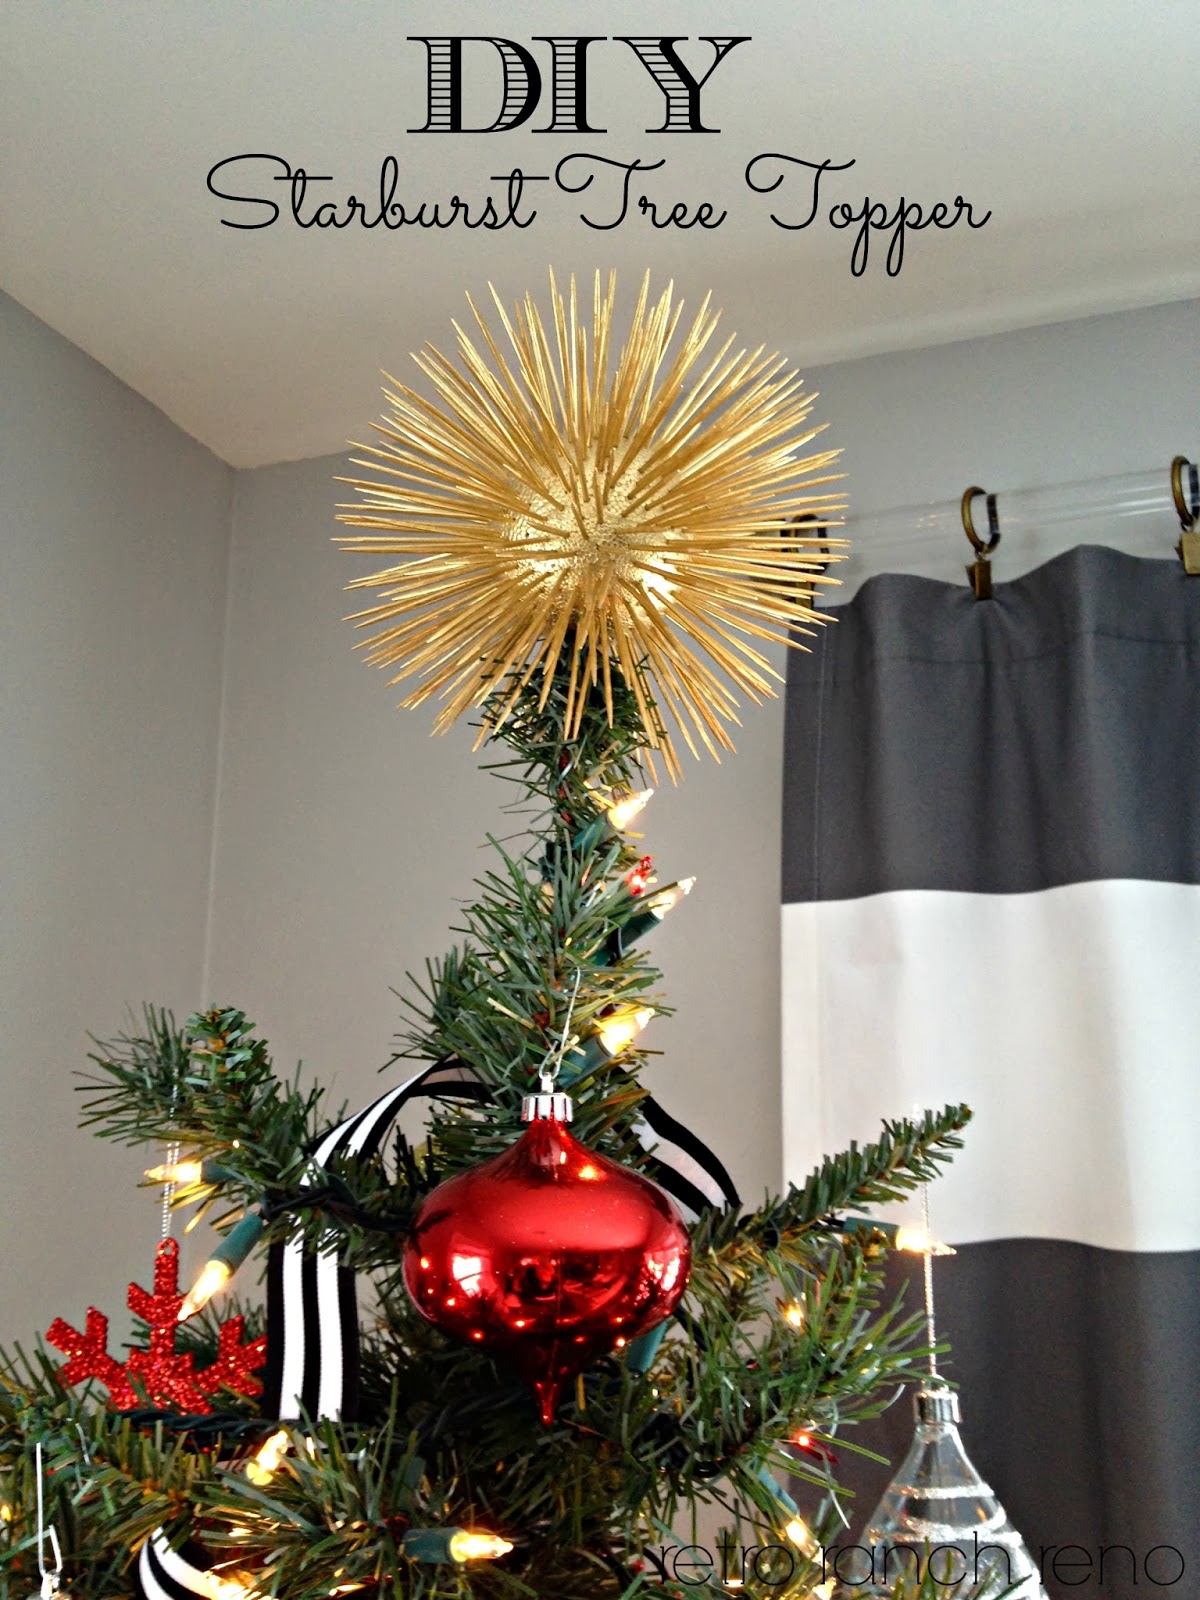
DIY Starburst Tree Topper

Hubs and I have a skinny, pre-lit, artificial tree in our home.  My parents bought it for me when I first purchased my townhouse in November 2006.  It was perfect then because we didn't have a ton of floor space to work with, and luckily, the skinny tree transitioned well into our new home.  Even though we now have much more space, our layout is very open, and that makes Christmas tree placement quite tricky. Therefore, our skinny lil' tree = still our best bet.

And I don't mind that we don't have a huge-statement-making tree.  In fact, it's one of my least favorite things to decorate for Christmas. {GASP!}  Maybe that'll change as we grow our family and they help to trim the tree, but for now, I have a lot more fun spreading the festive cheer to all different areas of our living space. The mantel is by far my favorite thing to decorate, and what I focus on most.

All of that back story may help to explain why I don't have a great tree topper for our beloved little skinny. As a matter of fact, I think there were a few Christmases where I never even used a tree topper. {GASP again!}  Any super cute topper I'd find in a store would inevitably be too heavy for fakey to hold up straight.  Usually, I'd end up MacGyver'ing something to finish our tree off each year.  This year, I was set to MacGyver something again, when I saw the best DIY tree topper from Bethany, and I knew I had to make my own!

Unfortunately, I didn't have the exact supplies she used, so I had to improvise because I was on a tight deadline for the Blogger Stylin' Home Tour series and I was too lazy to run out to the store. ;)  Thankfully, I had everything I needed to make a knock-off version of hers: 1) a small styrofoam ball {from a craft project that never came to be}, 2) toothpicks and 3) gold spray paint.

Bethany used a PVC pipe to hold her topper up, but since I didn't have one myself, I used a small screw driver and dug out a narrow hole that went 1/2 way through the ball.  I stuck the top branch of my tree through this hole to keep my topper on and upright.

Then I just started poking toothpicks into the styrofoam...nothing too difficult here!


Watching Home Alone while you make your topper ins't mandatory, although it makes the process go more quickly! ;)


What do you guys think?  Not bad for a $0 project!!  I might even use this topper in years to come! ;)

I'm linking up my project to the Dare to DIY series hosted by four amazing bloggers:


This week Kim is hosting, so make sure you go by to see her project and to link yours up too!

Also, make sure you come back Wednesday for some jingle bell inspiration! I am participating in a Jingle Mingle with Cuckoo4DesignShift Ctrl Alt, Nalle's House, Primitive & ProperDwellings by Devore, and Bliss at Home.  You'll want to see what we each have up our sleeves! :)


Linking up to: