Showing posts with label DIY. Show all posts

Friday, August 7, 2015

DIY Jewelry Organizer - Tutorial.


I really shouldn't even call this post a "tutorial".  A couple people asked how I created my jewelry organizer, and I'm more than happy to share...but please don't be surprised that I winged whole project!!


Step 1: Buy a piece of MDF from Home Depot.

Step 2: Spray paint it with my favorite spray primer as I was priming a few other projects.

Step 3: After it's dry, let it lean up against your master bedroom wall for over a year while you put the project off.

Step 4: Keep your beloved jewelry in a massive pile on a tray in your bedroom.

Step 5: Get super fed up contending with a jumbled jewelry mess every day.

Step 6: Untangle all your necklaces and sort based on similar styles/lengths.

Step 7: Lay jewelry out on the MDF and play around until you like the placement.

Step 8: Get out tape measure and pretend like you are going to use it.

Step 9: Forget said tape measure and decide to just eyeball the placement.  Using a ballpoint pen, mark the spot where you need to drill pilot holes for the cup hooks you will later screw in.

Step 10: Drill pilot holes.

Step 11: Find a leftover gallon of white satin paint in the basement and apply two coats.  Allow to dry overnight.

Step 12: Get out your painters tape and start winging a design.  Decide you don't need to use a tape measure here either...just your eyeballs and a couple widths of tape will do.

Step 13: Get out the X-Acto knife and remove superfluous pieces of tape in your design.

Step 14: Whine like a big baby because being bent over doing all that taping hurt your back like no other.  Then suck it up and paint the white paint over your design to minimize bleed through.

Step 15: Use your favorite gold spray paint to paint to coat your design, the cup hooks, curtain rod bracket and metal strip you will later attach.

Step 16: Remove the painters tape while the paint is fairly wet so nothing rips the paint off.

Step 17: Hate your project because there are paint splatters all over that you didn't notice while spraying, but are VERY obvious now that it's dry. (Note - do not spray paint in the evening light.)

Step 18: Attach cup hooks and hang some necklaces while praying it looks a little better.

Step 18a: That didn't work so attach bracelet bar and earring holder hoping they'll distract from the ugly splatters.  Nope, still ugly.

Step 18b: Throw yourself a mini-pity party.

Step 18c: Use the non-tape-measure method and drill more pilot holes into your board because more necklaces hanging = less ugly board showing.  You will definitely like the project then.  WRONG.

Step 19: Wave the white flag and realize you need to start back at step 12...re-tape/re-cut out your design.

Step 20: Spray paint another coat, or two, of paint over your project...and now fall in love.

Step 21: Remove the tape while the spray paint is still semi-wet.

Step 22: Touch up any small areas where the white paint lifted with the tape.

Step 23: Spray a matte clear coat over the whole board to protect your project that you now love. Also, spray your hooks, curtain rod bracket and metal strip for the earrings.

Step 24: Reattach cup hooks, bracelet bar and earring holder

Step 25: Arrange your jewelry in a way that makes your heart happy, and thank the Lord this project can be crossed off your to-do list!!!

Optional step-

Step 26: Wonder how long it will take you to actually hang it on the wall instead of just leaning it up against the wall.
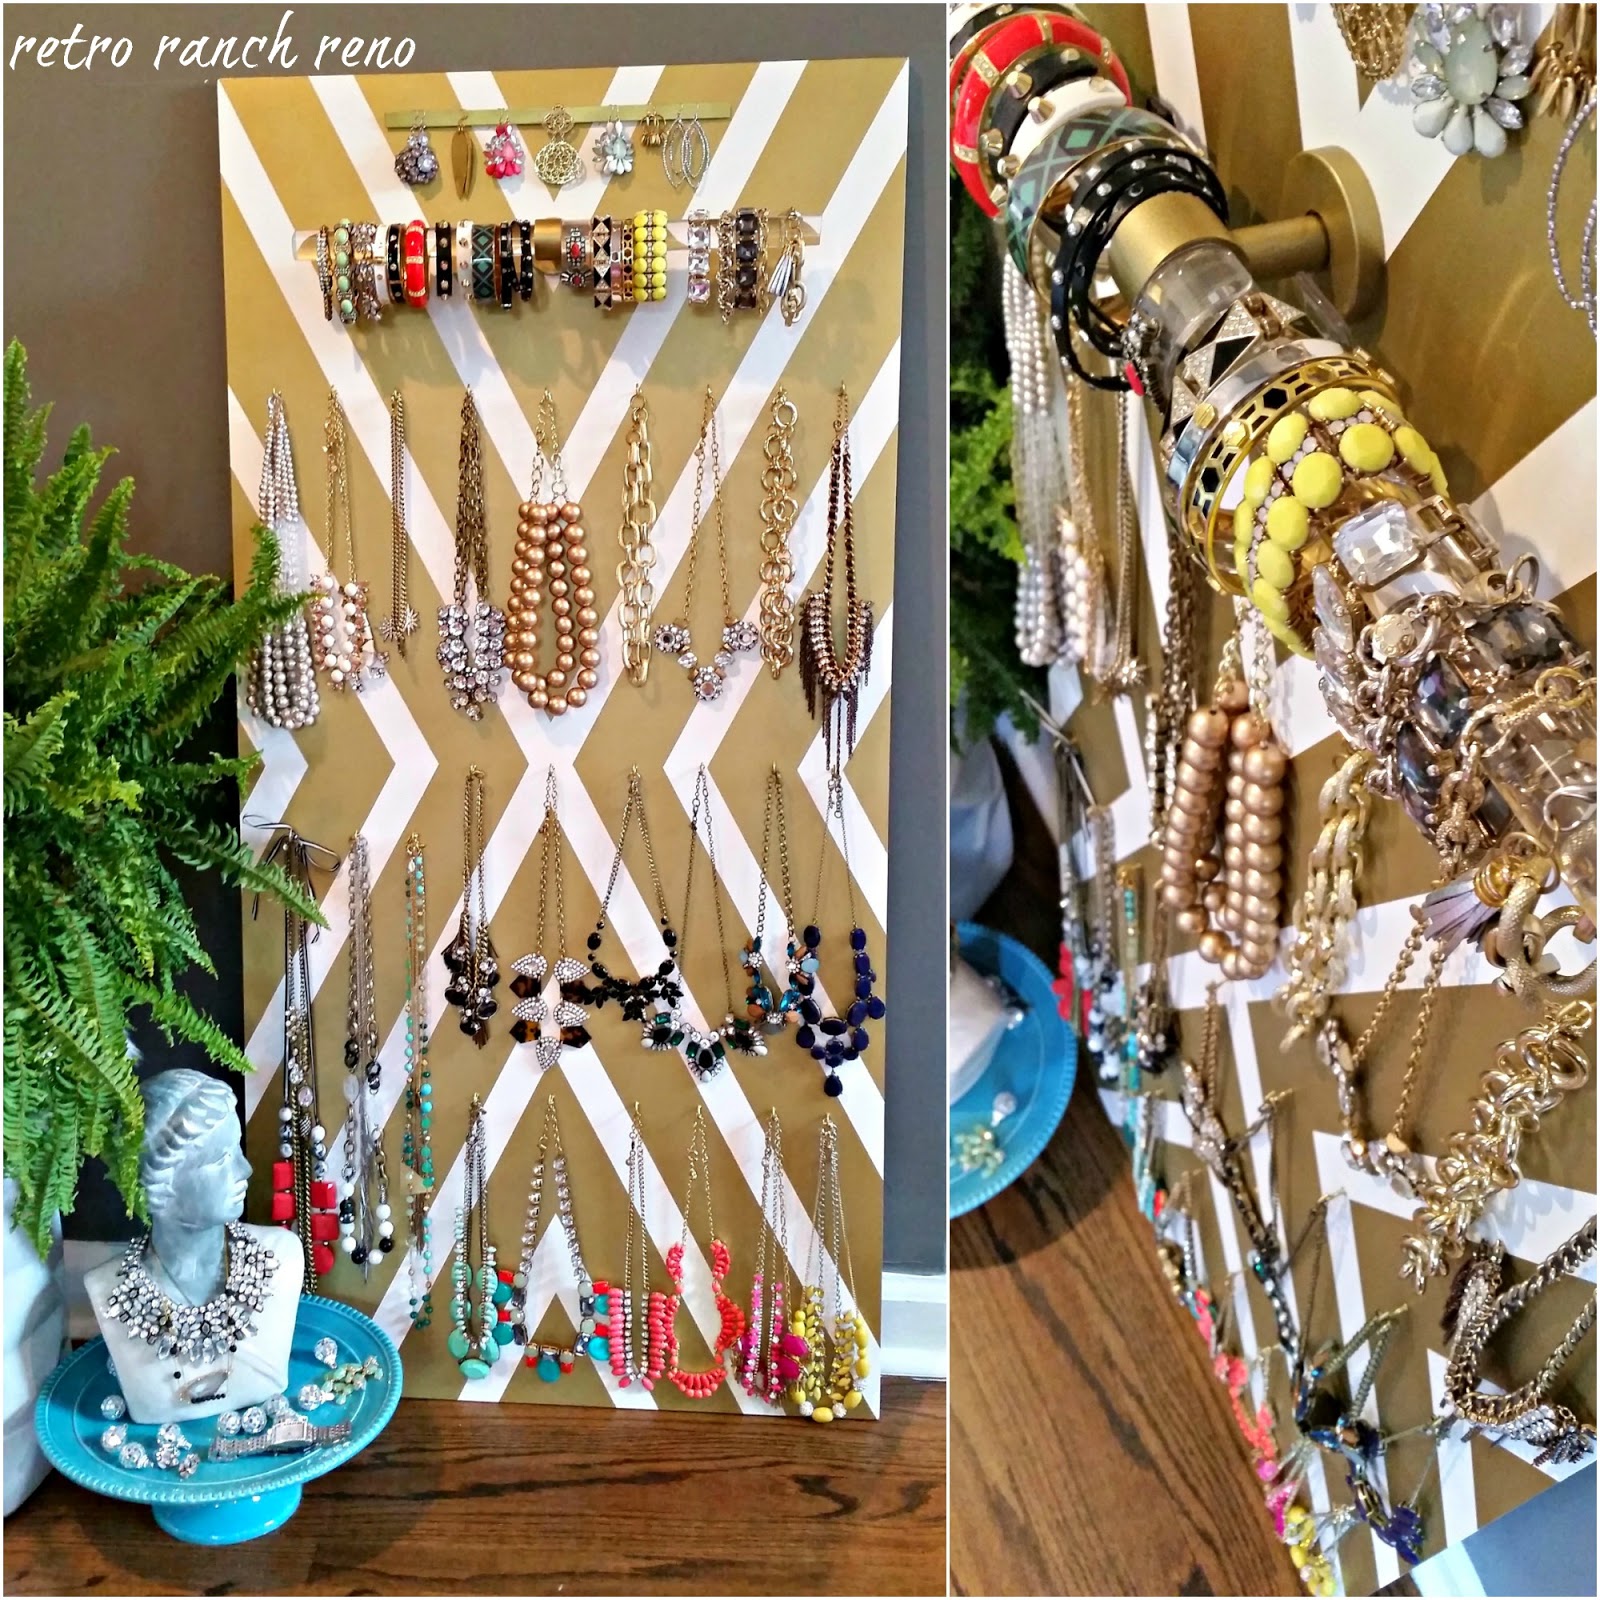

PS-the bracelet bar is made out of left over materials from my DIY lucite curtain rods, and the earring holder is made from a metal strip I picked up at the hardware store.  I simply drilled 3 screws halfway into the board, dabbed some gorilla glue onto each screw and positioned the metal strip on top.  Then I secured the strip in place with painters tape while the glue dried.

Tuesday, May 5, 2015

DIY Jewelry Organizer.

Today I'm taking a little break from our before and after series to show off a project I wrapped up not too long ago.  Don't worry, it'll be back soon...showing off our 1954 cabinets, in all their painted glory!

If you follow my Instagram account, it's no surprise to you that I love jewelry.  I'm a huge fan of the statement necklace and I have wayyyy more than is necessary for just one person.

Here's a snap shot of my current collection, and embarrassingly enough, this is after I purged 2/3 of what I used to have.


Since we moved into our house a few years ago, I've slowly been making my way through different areas of our home and clearing it out!  I've focused my attention on my closet and jewelry more times than I want to admit, and each time, I still found a ton to sell/donate/toss.

Now I'm not announcing that I'm on my way to becoming a minimalist...it's just not in the cards for this girl (although I so wish I could do it!!), but I do find something incredibly therapeutic about cleaning up and clearing out unnecessary material possessions.  For me, it frees up space in both our house and my mind.  And hopefully what I've left myself with is a collection of things I actually use, actually want and actually love.

Then it's time to organize said things.

When it comes to my clothing, jewelry and shoes, if I don't see it, I won't wear it.  I need visual access to my wardrobe to keep it fresh in my mind.  This is probably definitely because I have too much clothing, and therefore can't remember all of my options.  What happens then?  I wear 20% of my wardrobe 80% of the time.  (FYI, I'm well aware this is a first world problem and I sound like a huge brat right now.  I'm hanging my head in shame as I type...)

So when it came time to create a jewelry organizer, I knew I needed to see it all.  And since this organizer was going to be hung on a wall in our bedroom, I needed the display to somewhat double as art.

Throughout the process of this DIY, I had mixed emotions about how it was turning out.  Thankfully, I stayed the course, kept patient and it all worked out!  I really love the statement it makes against our dark walls and the immediate access to all of my pretty, sparkly things. ;)


Stay tuned for the wing-it-as-I-go tutorial!  And let's take bets on how long it takes me to actually hang this on my wall. ;)  We all know how I feel about hanging things...UGH!


-----------------------------------------------------------------------------------------------------------

Linked up to Work it Wednesday here!

Thursday, April 2, 2015

More Easy DIY Art.

As you already know, I’ve created a ridiculous amount of very amateur art for our home.  It’s fun to use little money and a bit of creativity to spruce up our space.  My latest “creations” include two amazing brights...coral and citron.  Mixing these invigorating colors with my favorite blues add a super fun pop to our home...perfect for spring and summer!

Two of the pieces I made were painted over old designs.  You might recognize them from my last post...


I mixed my colors mostly using a combo of $0.99 acrylic paints from my craft stash.  First I painted over my beloved stripes from Christmas to create blank canvas.


Then I started layering my favorite colors, and ended with a little liquid gold leaf.


After that was finished, I turned my attention to revamping a piece from last spring.  I truly loved it as is, but needed to freshen up the color scheme.  So I swapped out the hot pink for bold citron...just painting the new color over the old.


Then it was time for two new pieces.  Well over a year ago, I found two sizeable gold frames from Michael’s.  Both were on sale for $8...a deal I just couldn’t pass up!


I didn’t have a plan for them at the time of purchase, so I hoarded them in my junk craft room.  

One day I had a light-bulb moment and realized they’d be perfect to hang on our expansive wall that houses our barn door.  I didn’t have proper paper to paint on for these frames, so I simply flipped over the “picture” that comes with the frame and painted on that.  It wasn't ideal, but a girl's gotta do what a girl's gotta do. ;)


A few brushstrokes later and I had new art!


For wayyyy too long they sat on our fireplace mantle because, well, I hate hanging things.

Several weeks went by and was finally forced to hang them because we were having company.  (Isn't that always the best motivator?!?!?!)

I absolutely love the statement they make in that formerly boring corner.


I love getting four "new" pieces of art for next to nothing!  

Anyone else swap out and recycle their art?

Thursday, February 26, 2015

I Heart Art.

I really do.  I may not be the best at it, but I have a blast creating swap-able, inexpensive pieces to hang around our home.  I've dabbled in super amateur art before. Here, here, here, here, here and here.


Then last spring I created a few more pieces on some scrap wood I had stashed in our hall closet.


This past winter, I painted another scrap piece to help make a statement next to our Christmas tree.


After we took all of our Christmas decor down I was craving a bit of spring.  It's been very chilly, and once the holiday season ends, I am NOT a fan of the colder, darker months.  To combat the current season, I added pops of coral and citron to our great room.  An inexpensive way to get these colors into our living space was to update some of the art I previously painted above.  I can't wait to share it all soon!!

Anyone else ready for winter to end?!?!

Wednesday, February 11, 2015

Leaner Mirror Makeover.

Once our walls went dark, I really fell out-of-love with our large leaner mirror.  It blended in with the walls and didn't provide any pop.


I solved that problem the same way I solve 90% of my other problems....with some leftover paint!!

For our master bedroom refresh, I knew I didn't want to completely rid our room of my signature teal color, so rather than have an accent wall covered in Behr's Balmy Seas, I wanted to incorporate it using accessories and accents. That gorgeous shade of teal would be the perfect hue to make our old mirror come to life again.


I took it outside, spray primed and painted it with a leftover paint sample.


Once that was done I got out my Citri-Strip gel, coated the over-spray and used a scraper to clear the mirror surface.  (Yes, I was lazy and didn't want to cover and tape before I primed, so I had to strip later.)  After that, I used Minwax's polycrylic in semi-gloss to cover and protect the paint.


And voilà...a new mirror!


I think it looks great against our dark walls, and all dressed up for the holidays... ;)


Can't wait to share more details soon!!!

Friday, February 6, 2015

Quick DIY Cork Coasters.

Here and there I've been working on our master bedroom refresh.  I promised myself and even declared to the blog-world that I would finish the space by the end of the year, but it just didn't happen.  I'm getting close.  As you can see here, it's all about the details now.  Once I check a few more things off my to-do list, I'll finally be D-O-N-E!!!

What's left, you ask?  Finding the right pillows (I've been on the pillow hunt for more time than I want to admit...I've fallen in love, but my budget never got the same warm and fuzzy feelings), DIY'ing some jewelry storage, pretty-ing up our exposed lamp cords (with paint or a DIY cord-cover project) and a DIY art canvas.

Since I've talked enough about what ISN'T done, let me prop myself back up on what I've actually finished: upped the cozy factor in our room with dark walls, installed our DIY lucite curtain rods, painted our DIY curtains, hung our TV gallery wall (sneak peek here), stenciled our gloss-on-matte accent wall (sneak peek here), hung our wall lamps, swapped out our focal point mirror, painted our old leaner mirror and DIY'ed some simple coasters for our nightstands.

You see, hubby and I drink a ton of water...and every night we each have a bottle or glass of water next to us in bed.  Normally I wouldn't be such a freak about putting a drink on a side table, but these "nightstands" are one of my favorite Craigslist makeovers I've ever completed.  


The thought of ruining one with a water ring makes me cringe.

So the easiest/cheapest/most-stylish solution I could come up with was painting a 4-pack of cork coasters from Michael's.

This project took all of 10 minutes, is embarrassingly easy and pretty much self-explanatory, so I feel silly even posting about it, but hey, I love how they turned out...so why not show them off?!

First, I gathered my supplies: 1) the coasters, 2) some left over paint samples and acrylic paints, 3) old paint brushes, 4) painters tape, 5) liquid gold leaf, 6) Krylon clear finish spray and 7) an old piece of cardboard to paint on.


Then I taped off different areas on the coasters and started painting!  I didn't have much of a plan for shapes or color placement.  I just crafted without thinking or measuring.


Once everything was painted, I used a Krylon clear spray to lightly coat each coaster 2 times to protect my award-winning paint job.


After the coasters dried, they were ready to go!  I love the colors and how pretty they look compared to the folded over paper towels we were using. ;)


High-five for super-simple, cheap projects!!!!  Happy Friday, friends! :)

Wednesday, November 26, 2014

Friendsgiving Blog Video!

Yesterday I shared the super fun collaboration between me and my good friend, Dina, the Dish It Girl.  We had a blast using our passions for decor and food to create a little Friendsgiving dinner.  If you want to see some behind-the-scenes action (and what I sound like in person....eeeeeek), check out the YouTube video below!!


And I know you'll want the recipe for that UH-mazing fig and Cabernet cranberry sauce after watching, so head here to grab it!!

Thanks for teaming up, Dina...and again, Happy Thanksgiving to you all!  I'm so thankful for each one of my readers and friends! Xo!

Tuesday, November 25, 2014

Thanksgiving Tablescape & Dish It Girl Food!

I love this time of year.  It's all about gathering with loved ones, and celebrating all we have to be thankful for. Unfortunately, the stress of planning a gathering can occasionally get in the way of the enjoyment it should bring us.  So to keep things simple, just remember there are two key components for a successful celebration: 1) good food and 2) fun decor.  The good company you keep is just a given in this equation. ;)

Hubby and I hosted a little "Friendsgiving" dinner this past weekend.  I supplied the decor, and thankfully (for this not-so-skilled cook), my good friend Dina from Dish It Girl, brought the good food along!!


When it comes to dinner parties or hosted holidays, I like to keep things relaxed and casual.  I don't worry about proper place settings...making sure my water glass is properly spaced from my plate, if my silverware is appropriately laid out, etc.  Instead, I focus on creating a table that is practical, comfortable and pretty to look at. :)


Like most projects I complete, I did this tablescape on a budget and even included a few DIYs in the mix.


My runner was a simple strip of fabric I carefully cut, making sure to remove any rogue strings from the edges.  The acorns were a past project that I updated this year to match my color scheme.  


I found the faux pumpkins and pine cones at Michael's.  I updated them with some brightly colored spray paint and acrylic paint.  The wooden candle sticks were a beat up clearance find from Target that I gave new life to with, what else, but more spray paint!  


I found the tea light holders and mason jars (just remove the lids) at Michael's during a 50% off sale, and the coordinating cloth napkins were only a few dollars from Home Goods.


I know it's not a typical Thanksgiving table you'd see every day, but that was my intention.  I really wanted to step outside my comfort zone and try to put a colorful spin on the holiday. :)

You know what else wasn't typical?!?  Dina's food!!  It. Was. So. Good.  She spoiled us with herbed turkey breast, sausage stuffing mushrooms and fig and Cabernet cranberry sauce.


Yes, that's right...fig and Cabernet cranberry sauce.  It was delish!

Head to Dish It Girl right now to get all of her amazing recipes!  Your taste buds will thank you. ;)
*
*
*
*
*
***And HAPPY THANKSGIVING!!!!  I'm so very thankful for each and every one of you!  Xo!!***