Wednesday, May 22, 2013

Operation Hearth Re-Tile - The Tile Shop Inspiration

For those of you who follow me on Instagram, you may remember that over the winter I developed a major itch to demo our old fireplace hearth and replace it with something dreamy {and more our taste} from The Tile Shop.

When we purchased our home, we were sooo excited to have a fireplace, but the finishes of it definitely weren’t our style.


The wood trim got a fresh coat of white, and so did the dingy, dirty red brick.


The brass screen was sprayed painted a brushed silver, and the worn, unattractive red tile was primed and painted a charcoal gray.  {Don't mind the old Christmas decorations...we moved in on Christmas Eve.}


That solution worked for the short-term.  It helped to bring our fireplace into this decade, but then, you know me...I grew tired of the paint chipping up, and I started dreaming of how much better the fireplace could be.  In other words, I got antsy to cross another project off the list.  I decided it was time to try my hand at tiling.  Ahhhh!!

To get some inspiration for the project, I headed to The Tile Shop showroom, which luckily, just opened a few months ago near our house.  I thought I would make a bee-line for the marble tile choices, but I was mistaken.  The minute I stepped in their doors, I was drawn to all the beautiful displays they had set up.  My absolute favoriteeeee was this bathroom.  I loved every. single. thing. about. it.


After lots of unintentional browsing, I was able to remind myself that I was there for our hearth project, not for a bathroom re-do…so I made my way to the marble mosaic tiles.  I think it's safe to say that I am obsessed with marble tile.  The white and grey veining is perfect for our home, and I love that it’s a classic material.  If it's cut into square tiles, it can be traditional....subway tiles, it can be classic...and then there is the hex tile.  Ahhhhh, the hex tile.  Pardon me while I swoon. ;)


I love that in marble, the hex tile is a classic choice, with a modern twist...perfect for the look we wanted to achieve on our hearth!  {And I'm not gonna lie...some subway tile in a herringbone pattern would also be UH-mazing, but the thought of that was a little nerve-wracking for me to take on for my first tile job.  Eeeeek!!  Maybe that'll be the right choice for a backsplash when the time comes. ;)}

Thank you, Tile Shop for totally indulging my love of hex tiles.  I was able to drool all over them and narrow down my choice to the 1" and 2" mosaics, seen above. 

So with all of that inspiration in mind, it was time to get to business.  I was ready to show that old hearth who is boss!!


***Although I was super, duper lucky to get some free tile and materials for this project from The Tile Shop, this is not a sponsored post.  I've always promised to keep it real with you guys, so I wanted to let you guys know how much they rock! :)***

Monday, May 20, 2013

Sew in Love.

After I finished up a friend's curtain panels, I was on a major sewing kick.  I had just purchased this beautiful citron-ish fabric a few weeks ago, and knew it'd tie perfectly into our house...it was just a matter of where I'd use it.


I decided a spring runner for the dining room table would be perfect and got to work.  I cut off a piece the fabric...making sure I left plenty of yardage for other projects.


Then I started pinning just like I did with the curtains {except I kept a smaller seam this time} and ran things through the sewing machine.


I'm a big fan of how the yellow pops against our dark wood dining table.  I'm just sewwww in love with it.  See what I did there?  Yup, I'm a nerd.


And don't forget to enter my very first giveaway with Modern Masters!!

Friday, May 17, 2013

Modern Masters Metallic Paint Review & {Giveaway}!!


One lucky day I was contacted by the sweet people at Modern Masters to review some of their products.  I could choose from their metallic paint collection or try out their metal effects kit.  You all know how much I love to paint everything {some examples here and here}, so reviewing a paint product was right up my alley!

I headed to their website, and was immediately impressed with the number of colors they offer.  I had quite the difficult time narrowing down which I wanted to try out, but after a great debate, I made my choices...and then stalked my mailbox until my package arrived. ;)

My thoughts then turned to what I wanted to try the paint on.  Luckily, I was in the middle of a project that could benefit from a little metallic paint.

We had a large wooden tray that needed a major makeover.  {Yes, I had already started sanding when this "before" was taken...whoops!}


I sanded and re-stained the piece because the undertones were a little too red for my liking, and the cup rings were not the prettiest thing to look at. 


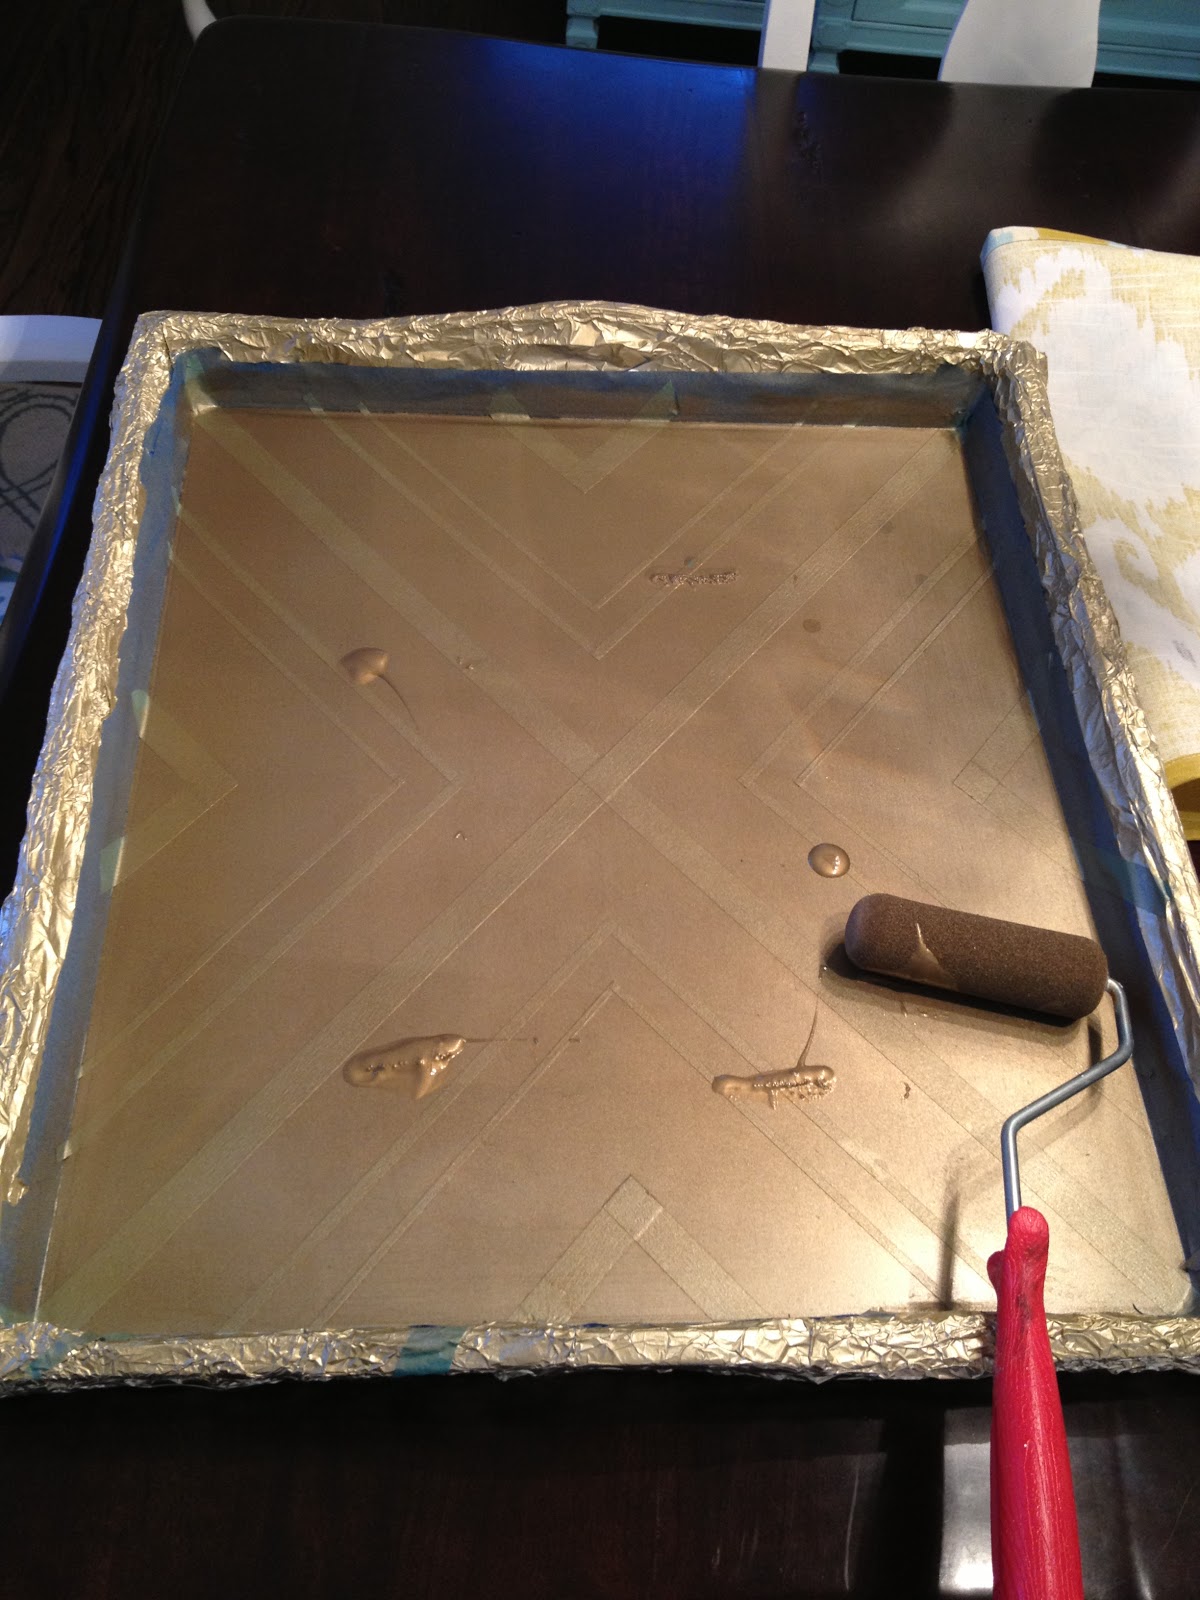
Once that was dry, I tapped off {and aluminum foil-ed off} the areas of the tray I didn't want to get paint on.  Then I grabbed a couple different widths of stencil tape from my craft basket and started laying out patterns.  {And before you ask...nope, I didn't measure a thing.  I just eyeballed everything to make sure it appeared even.  One of my requirements for this design was that I did NOT want to have to measure a. single. thing.}


After all the tape was down, I used an exacto knife to cut away the pieces I didn't want.


Then I took my tray outside and gave it two coats of gold spray paint and primer {Rustoleum's Universal in Pure Gold...best gold spray paint out there...in my opinion, of course}.  I wanted the design to appear pretty opaque, and I wasn't sure how sheer the metallic paint would be.  So I figured, better to prime the surface and be safe, rather then sorry!


Once the spray paint dried, I pulled out the new paint...woohooooo!  {I used Brass - ME289.}


I placed a few small blobs of paint onto the tray and rolled 2-3 coats on, waiting only a few minutes in-between each of them.


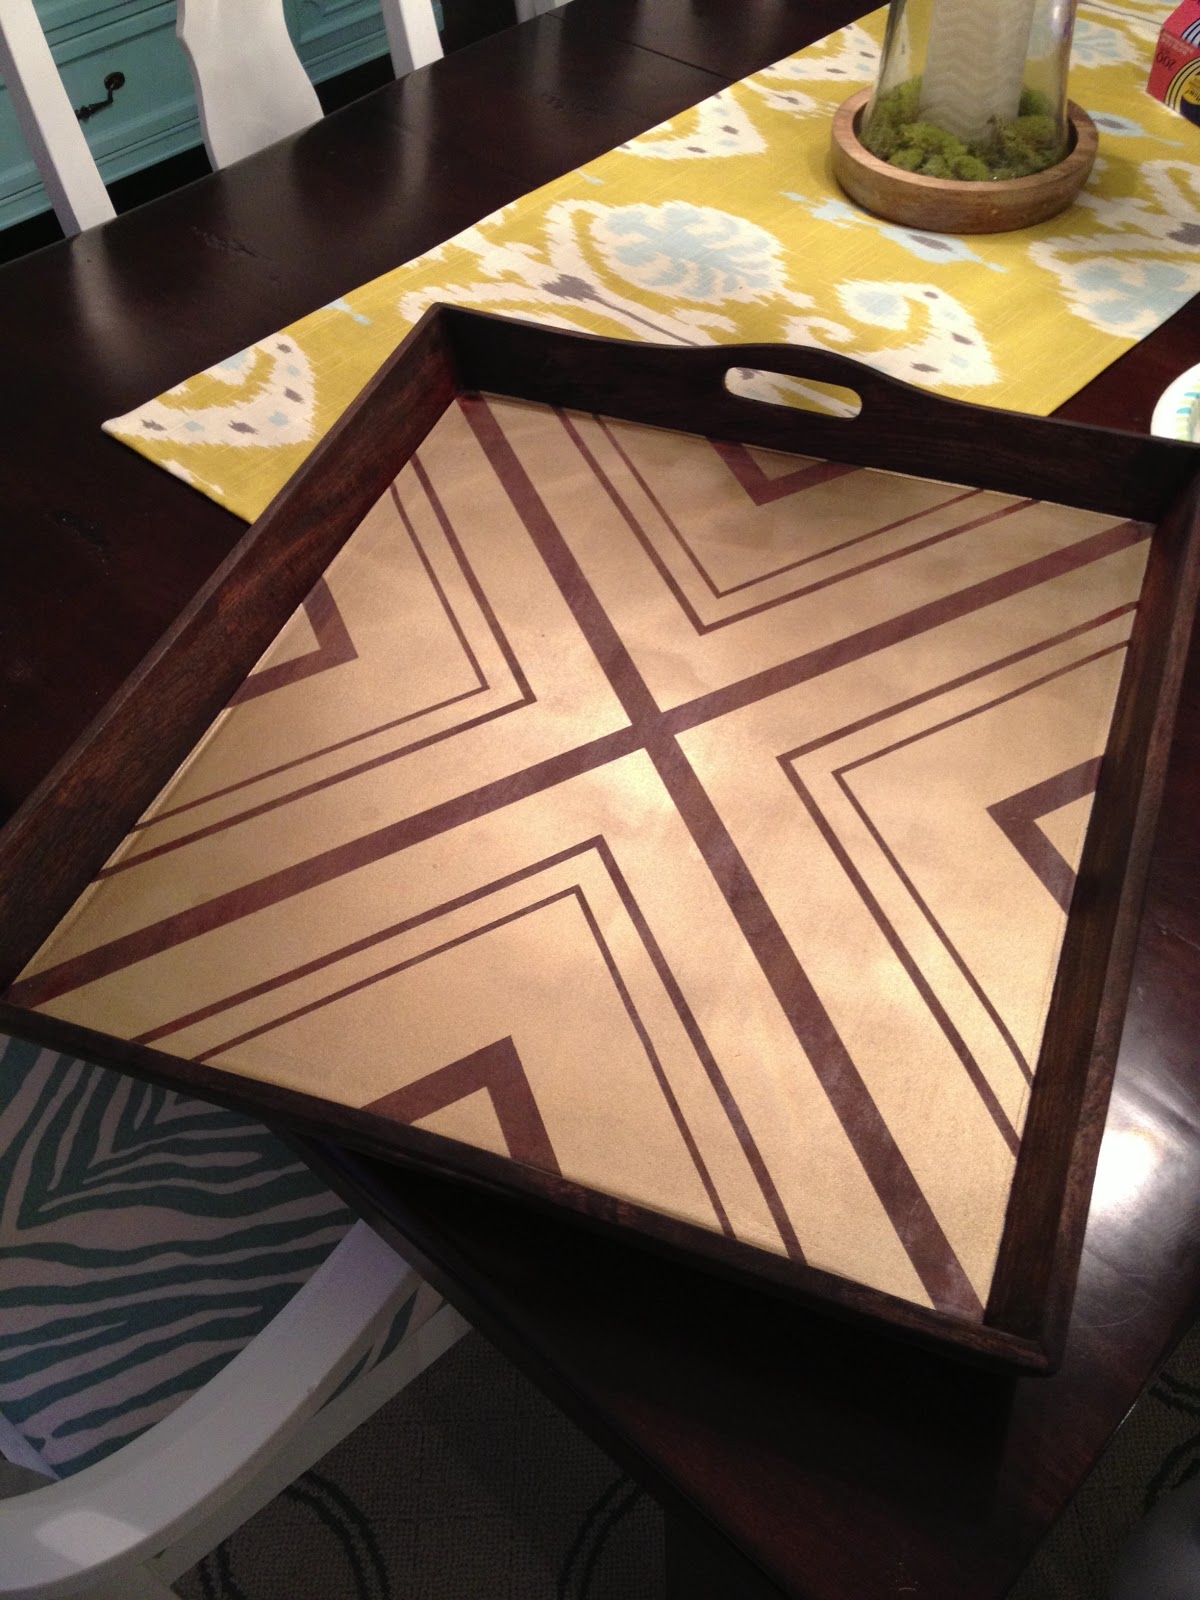
Then I peeled back the tape to see things unfold...


It's amazing what a little metallic paint can do, huh?


And now for my honest opinion of this stuff....it rocks!!  I was hooked after the first coat of it went onto the tray.  The paint is incredibly easy to work with, the finish is beautiful and a little bit goes a long way with this stuff!!  In fact, I was so smitten with it after completing our tray, that I immediately started working on a couple wooden signs for some special blog ladies in my life...and thennn I used it on a couple gallery wall additions for our hallway!


Word even got out to a friend of mine that I loved the paint so much, that she graciously volunteered a table of hers to be made over with the Blackened Bronze - ME238 Shade. ;)  Keep a look-out for the reveal of that next week, and enter my very first giveway below!! :)  One super lucky reader will win their choice of either one quart and 6 oz. container of any color OR four 6 oz. containers of any color OR a metal effects kit {one pint primer, one pint reactive paint, one 4 oz. solution or rust activator, one spritzer cap, one pint of Permacoat Xtreme for rust only} from Modern Masters!! :) 

Good luck everyone!

**All opinions in this post are 100% mine...I'd never lie to my amazing readers!!**

Wednesday, May 15, 2013

DIY Curtains...For a Friend...That I Want to Keep.

Follow my blog with Bloglovin A sweet friend of my recently came to me with a dilemma.  She was working on overhauling her office, and could not find curtains for the space.  Things were either too expensive, or just weren't the look she was going for.  I could totally relate...the same thing happened to me every time I looked.  So I told her there was an easy solution...just buy fabric and make them!

She said great!  Buuuuut she didn't have a sewing machine, and she didn't know how to sew.  Welp, that could be a problem...except for the fact that I have one and knew how to {well learned to from my Mama}.  So we planned a date to fabric shop at a discount store near work, and she picked out a gorgeous orangey ikat fabric.  It's amazing...as in so amazing, I might need to go back and get myself a yard or two.

Anywho, once the fabric was bought, it was time to get down to business.

My friend was not going to use these for function {no opening and closing of the curtains to hide the window}.  Like those in our house {here, herehere and here}, she only needed them to dress up the space and add a pop of color.  This helps to keep the cost of fabric down, since you can usually just buy the yardage you need for one panel and cut it down the middle to make two.

So that's just what I did.  I sliced the fabric in two and lined things up making sure the fabric was running the same way. 


Then I started pinning... 


And sewing...


After some time, I was all done with both panels!


Well I use the word "done" loosely.  I didn't sew the bottom hem yet because I was waiting for her to hang her hardware so I knew how long to make the curtains.  Hopefully I can post a picture of them hanging in their new home soon! :)

Anyone else ever make a project for someone that you wanted to keep yourself?  Am I the only bad one? ;)

Monday, May 13, 2013

Planting Pops of Color.

The same day I planted my succulents, some outdoor planting got accomplished too.  The outdoor stuff is what actually kicked my butt into gear to get the succulents done.

On a recent trip to IKEA, I couldn't resist helping myself to a few planters.  Two of them, you saw here...they live on our front porch.


The third one I purchased is a white, three-tiered plant stand.  I totally fell for the uniqueness of it.  I adore the fact that it's not a typical planter you see every day. 


Hubby couldn't wait to add some life to it, so during a nice weekend day, we headed to Home Depot's Outdoor Center...along with the rest of the world. ;)


We picked out beautiful dahlias for the front porch planters and some colorful begonias for the IKEA planter.

We even purchased two hanging planters of pansies, but removed the hanging apparatus, and put them at the bottom of our patio steps.  They are a great pop of color in our backyard.


Since I love all things ombre, I decided to organize my begonias in an ombre type fashion...going from orange to pink.


Now this fun planter lives in our back porch, and gives us a pretty view, both out the kitchen window and from the back patio.


PS-The dahlias on our front porch have now fully bloomed.  When we went to the garden center, we chose the plants that had the least amount of open blooms on them.  We were hoping that if we bought plants that hadn't yet blossomed, we would be able to enjoy more of it's time in bloom.  It seems to have worked, and they are thriving.  Heck, the ones we bought for the back yard have even been thriving!  High five for us not killing our new plants after a few weeks! ;)

Wednesday, May 8, 2013

Late to the Succulent Planting Party...

Yes, I know.  I'm totally late to this party, but I finally got myself some super cute succulent plants to live on the window ledge in our kitchen.

It all started when I found these adorable little planters at Target.  {Yup, the same trip I purchased my door mat for the front porch}.  Technically, I think they are votives, but to me, they look like mini-planters.


Now I just needed some plants...and for that, I thought I'd have to go to Home Depot.  NOPE.  I walked into my local CVS to pick up a prescription after work {shout out to Michelle and all the other pharmacists out there}, and saw they had a bunch of succulents for sale near the entrance.  I thought it was meant to be.  I picked up four of them, and brought them home.


Of course, several days passed before I actually did anything about planting them.  All it took was stealing some rocks from a bamboo plant we had in our bathroom to line the bottom of the votives mini-planters...


Then I put the plant and some extra soil in...


Boom, done! Plants in the window. 


Monday, May 6, 2013

Crack is Still Whack...Close-Up.

Remember when I explained how crack is whack?  Yup, I do too...because I'm still in shock I was able to repair our plaster wall as well as I did.  In fact, I was so excited to share it with you guys, that I never gave you proper "after" shots of the wall.  I'm 99.9% positive the paint was still went when I photographed things, and for sure the electrical outlet cover was off and the mantle was covered in plaster dust.

So this post is all about a prettier version of our wall now....with different angles so you can see that I actually did a half-decent job!

Where I started {before our outlet was installed}...


And then after the outlet was put in...


Things had to get worse...


Before they could get better...


Not bad, right?!

Wednesday, May 1, 2013

Front Porch Painting & Quick Update...

In my last post I mentioned that things have been B-U-S-Y around here lately {life, merger at work, blah, blah, blah}.  Sadly, that means the blog has taken a backseat, but have no fear...we tried are darnedest to keep up with house-related projects.

One of those projects was a quick {well, only on my part...thanks Dad} update to our front porch.  When we purchased our home, we painted just about every square inch of it because it looked like this.  Ahhhh!


Don't worry...it looks more like this these days, so please don't let the nightmares of a big, overgrown, green blob keep you up at night. ;)


I know some people aren't the biggest fans of painting wood or brick, but in our case, the old red steps {refer to the creepy picture above} just weren't doing anything for our house.  They needed to be painted, and we were super happy we did it.

It's been about a year and a half since we painted them, and after tons of use and abuse, the red brick was showing through in some places.

So during my parent's last visit a few weeks ago, my dad asked what he could do to help us around the house.  I kindly told him nothing, and then proceeded to fan him and feed him bon bons jumped at the chance for him to re-paint the steps.


I've said it a million times, but I will say it again...it's crazy what a difference some paint can make!  The steps look so good after getting a fresh coat of grey.

And during a recent trip to Tar-jay, I came across the cutest gradient door mat {reminiscent of the pink Clara rug that YHL decorated with} that perfectly matched our teal front door.  Obviously, I didn't resist and threw it in my cart.  It helped that it was on sale. ;)


Add a few dahlia plants in my new IKEA planters...and our front porch is ready for spring! :)

Close to the Heart...

I hate to resort to begging...but I have no shame, and therefore I will do it right now.

Please, please, please take a minute to help out a friend of mine with a wonderful cause.  All it takes is one second to head to the site and click vote!  It is in loving memory of her brother, who was also a very dear friend of mine, that we lost way too soon.

Thank youuuuuuu!!!!!!!!!

Go here....vote now...pleaseeeeee!! :):)