Showing posts with label jewelry organizer. Show all posts

Friday, August 7, 2015

DIY Jewelry Organizer - Tutorial.


I really shouldn't even call this post a "tutorial".  A couple people asked how I created my jewelry organizer, and I'm more than happy to share...but please don't be surprised that I winged whole project!!


Step 1: Buy a piece of MDF from Home Depot.

Step 2: Spray paint it with my favorite spray primer as I was priming a few other projects.

Step 3: After it's dry, let it lean up against your master bedroom wall for over a year while you put the project off.

Step 4: Keep your beloved jewelry in a massive pile on a tray in your bedroom.

Step 5: Get super fed up contending with a jumbled jewelry mess every day.

Step 6: Untangle all your necklaces and sort based on similar styles/lengths.

Step 7: Lay jewelry out on the MDF and play around until you like the placement.

Step 8: Get out tape measure and pretend like you are going to use it.

Step 9: Forget said tape measure and decide to just eyeball the placement.  Using a ballpoint pen, mark the spot where you need to drill pilot holes for the cup hooks you will later screw in.

Step 10: Drill pilot holes.

Step 11: Find a leftover gallon of white satin paint in the basement and apply two coats.  Allow to dry overnight.

Step 12: Get out your painters tape and start winging a design.  Decide you don't need to use a tape measure here either...just your eyeballs and a couple widths of tape will do.

Step 13: Get out the X-Acto knife and remove superfluous pieces of tape in your design.

Step 14: Whine like a big baby because being bent over doing all that taping hurt your back like no other.  Then suck it up and paint the white paint over your design to minimize bleed through.

Step 15: Use your favorite gold spray paint to paint to coat your design, the cup hooks, curtain rod bracket and metal strip you will later attach.

Step 16: Remove the painters tape while the paint is fairly wet so nothing rips the paint off.

Step 17: Hate your project because there are paint splatters all over that you didn't notice while spraying, but are VERY obvious now that it's dry. (Note - do not spray paint in the evening light.)

Step 18: Attach cup hooks and hang some necklaces while praying it looks a little better.

Step 18a: That didn't work so attach bracelet bar and earring holder hoping they'll distract from the ugly splatters.  Nope, still ugly.

Step 18b: Throw yourself a mini-pity party.

Step 18c: Use the non-tape-measure method and drill more pilot holes into your board because more necklaces hanging = less ugly board showing.  You will definitely like the project then.  WRONG.

Step 19: Wave the white flag and realize you need to start back at step 12...re-tape/re-cut out your design.

Step 20: Spray paint another coat, or two, of paint over your project...and now fall in love.

Step 21: Remove the tape while the spray paint is still semi-wet.

Step 22: Touch up any small areas where the white paint lifted with the tape.

Step 23: Spray a matte clear coat over the whole board to protect your project that you now love. Also, spray your hooks, curtain rod bracket and metal strip for the earrings.

Step 24: Reattach cup hooks, bracelet bar and earring holder

Step 25: Arrange your jewelry in a way that makes your heart happy, and thank the Lord this project can be crossed off your to-do list!!!

Optional step-

Step 26: Wonder how long it will take you to actually hang it on the wall instead of just leaning it up against the wall.
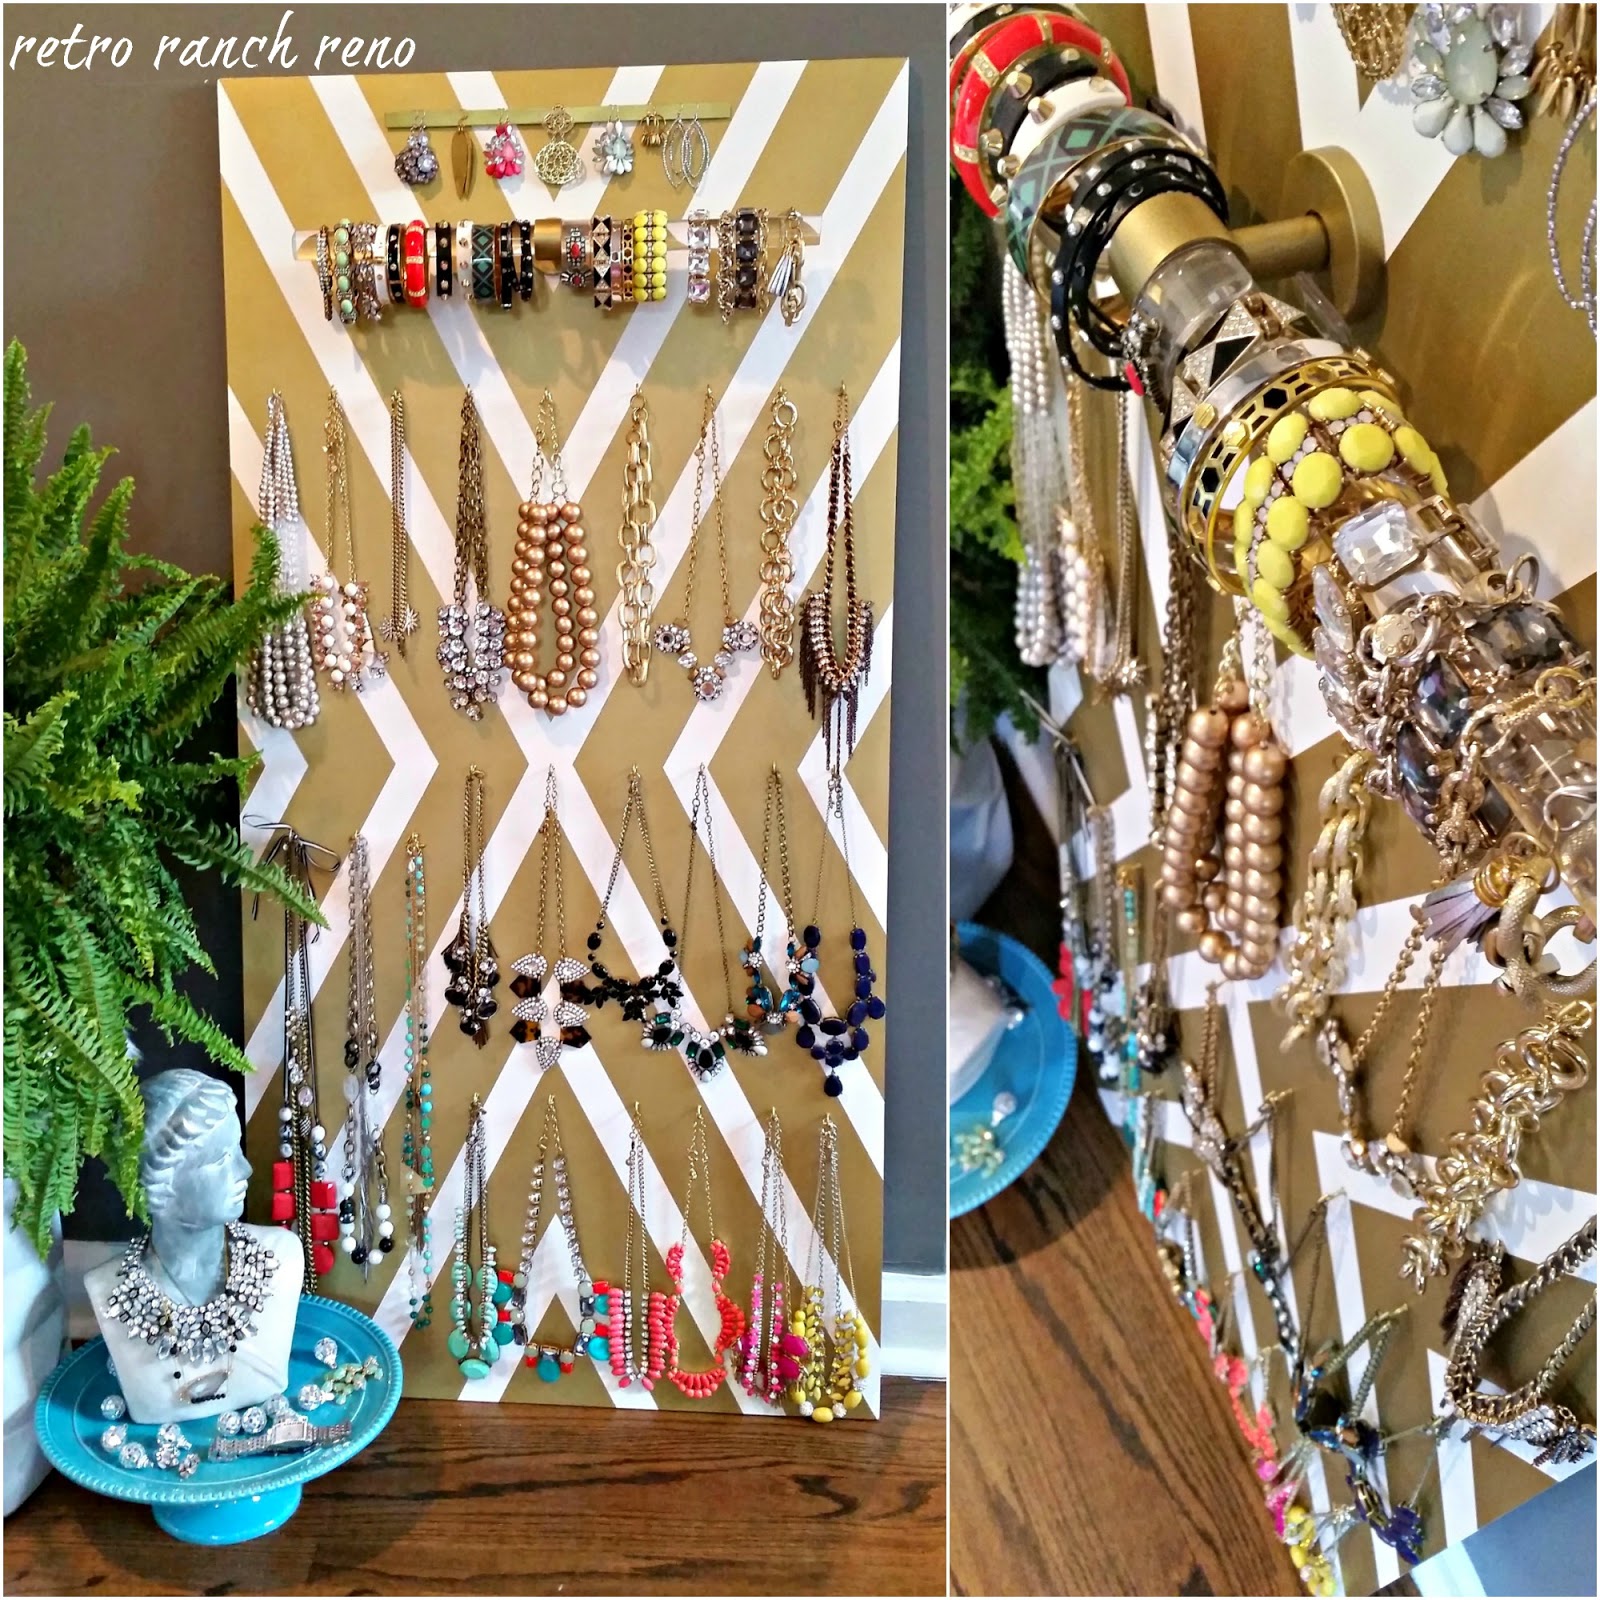

PS-the bracelet bar is made out of left over materials from my DIY lucite curtain rods, and the earring holder is made from a metal strip I picked up at the hardware store.  I simply drilled 3 screws halfway into the board, dabbed some gorilla glue onto each screw and positioned the metal strip on top.  Then I secured the strip in place with painters tape while the glue dried.

Tuesday, May 5, 2015

DIY Jewelry Organizer.

Today I'm taking a little break from our before and after series to show off a project I wrapped up not too long ago.  Don't worry, it'll be back soon...showing off our 1954 cabinets, in all their painted glory!

If you follow my Instagram account, it's no surprise to you that I love jewelry.  I'm a huge fan of the statement necklace and I have wayyyy more than is necessary for just one person.

Here's a snap shot of my current collection, and embarrassingly enough, this is after I purged 2/3 of what I used to have.


Since we moved into our house a few years ago, I've slowly been making my way through different areas of our home and clearing it out!  I've focused my attention on my closet and jewelry more times than I want to admit, and each time, I still found a ton to sell/donate/toss.

Now I'm not announcing that I'm on my way to becoming a minimalist...it's just not in the cards for this girl (although I so wish I could do it!!), but I do find something incredibly therapeutic about cleaning up and clearing out unnecessary material possessions.  For me, it frees up space in both our house and my mind.  And hopefully what I've left myself with is a collection of things I actually use, actually want and actually love.

Then it's time to organize said things.

When it comes to my clothing, jewelry and shoes, if I don't see it, I won't wear it.  I need visual access to my wardrobe to keep it fresh in my mind.  This is probably definitely because I have too much clothing, and therefore can't remember all of my options.  What happens then?  I wear 20% of my wardrobe 80% of the time.  (FYI, I'm well aware this is a first world problem and I sound like a huge brat right now.  I'm hanging my head in shame as I type...)

So when it came time to create a jewelry organizer, I knew I needed to see it all.  And since this organizer was going to be hung on a wall in our bedroom, I needed the display to somewhat double as art.

Throughout the process of this DIY, I had mixed emotions about how it was turning out.  Thankfully, I stayed the course, kept patient and it all worked out!  I really love the statement it makes against our dark walls and the immediate access to all of my pretty, sparkly things. ;)


Stay tuned for the wing-it-as-I-go tutorial!  And let's take bets on how long it takes me to actually hang this on my wall. ;)  We all know how I feel about hanging things...UGH!


-----------------------------------------------------------------------------------------------------------

Linked up to Work it Wednesday here!

Monday, June 25, 2012

What To Do, What To Do...


I had a problem that was really bugging me.  It took quite a few brainstorming sessions, but in the end, I came up with a solution.

You see, I have a serious obsession love affair with jewelry…and because of this “issue” I have accumulated a whole lot of pretty stuff.  Of course, owning a lot of pretty accessories is not an issue, but storing and organizing them is a whole different story.

This is what I was working with.


Yup, that's all my jewelry thrown into a laundry basket for easy moving.  I needed to lay it all out somewhere so I could sort, purge and organize.  Once I did...this is what I was left with.


I reallyyyy needed to come up with a system that would allow me to see everything.  My normal issue is that if I don't see it, I won't wear it.

So how the heck can I keep all this together, in a compact space, that fits behind our bedroom door?!?!?!  Hmmmmm.

At first I thought I could invest in a pretty curtain rod or towel bar {that didn't look too towel-bar-ish} for all my necklaces.  But most of what I found was 1) too wide, 2) too expensive and 3) wasn't the look I was going for.

After much searching, I finally came across the PERFECT thing!  It was....


...an old paper towel holder!!!!!!!!!  Say whaaaaaaaaaaaat?!?!?!

Yes, I know...I know.  It's not the cutest thing on the block, but I could see the potential.  All it took was a little charcoal gray paint, and BAM!  It was like this was made for my project!  {Plus, it had a built in shelf that would work perfectlyyy to hold the earring display I wanted to make.}


Once I settled on what would hold my 82374298234 necklaces, I got to work on making my earring display.  This part of my jewelry organization was the easiest.  I took an old frame that I had in our former townhouse, removed the glass and backing...painted it a pretty color...added some wire with a couple thumbtacks and a hammer...and taaa-daaaa, an earring holder!  Oh, and some felt and ribbons helped to make things interesting. 

So without further adieu, here is what I came up with.  Btw, my photography skills are HORRIBLE...I wish I could do better than snapping away with my iPhone.  Sorry for the terrible quality. :(  Le sigh....


Have you guys tackled some organizational projects lately?!?!  For less than $10, this thing rocks my world and makes getting ready THAT much easier every morning! :)