Tuesday, January 29, 2013

DIY Wood Shelves.

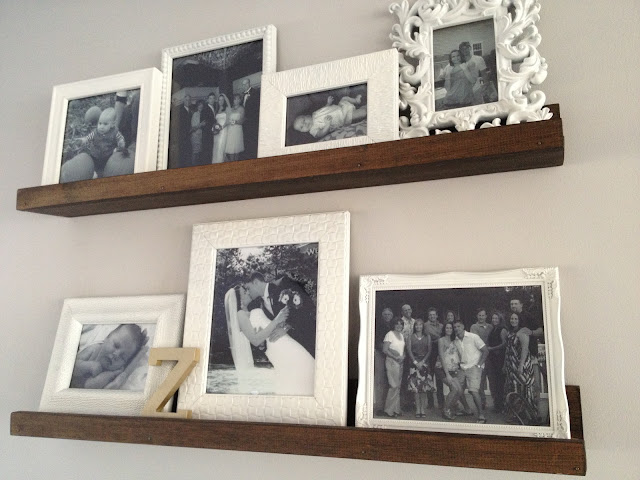
Or picture ledges...whatever you want to call them.  Either way, yay me.  I built something.  I don’t really care if they were the easiest things ever to build.  I'm convinced it still counts that I friggin’ built something!!  {Picture me patting myself on the back. ;)}

Some time ago, I put together a mini-gallery wall above our buffet in the dining room.  I loved the frames, but I wasn’t in love with the statement on the wall.  I couldn’t help but think that I wanted something more for that area.

Enter in the super cheap, super easy, super “$20 Shelves Anyone Can Build” from Shanty 2 Chic.  The minute I saw these, I knew they were just what our photo wall needed.  It’d add a little rustic, dark wood into the mix of white frames I had going on.  Plus, it said in the title that anyone could build them.  Consider me sold!

I measured the area that the gallery had covered, and roughly figured that I wanted 2 three foot long ledges.  Then I did a quick inventory of what supplies we had in the basement, put a list together of what I needed and hopped online to order everything we didn't have from Home Depot.  Once I received my email letting me know my order was ready to pick up, I headed out the door.  {Totally awesome service so you don’t have to run all over the store if you don’t want to.}

Once I got to Home Depot, they let me know that my order was in the back because I had things that were too big to keep up by the counter.  {This happens every time I order something dealing with wood, and I’m fine with it because where I pick up my order is right by the guy who cuts all the wood for me.}  I ordered 1 – 1 x 2 x 6 and 2 – 1 x 4 x 6...and after making sure all the boards were straight {don’t let them give you warped wood}, I had the nice wood-cutting-man cut all my lumber in half.  That left me with 2 – 1 x 2 x 3 and 4 – 1 x 4 x 3 pieces.  I also made sure I had my wood glue, wood screws and finishing nails in my bag.


Then it was time to get to work.  First I quickly dry-fit everything, making sure the boards I put together worked okay...


...and I gave everything a quick sand to soften up the sharp edges of the boards.  Then I CAREFULLY pre-drilled holes into the 1 x 4’s {to keep the wood from cracking/splitting}, and ran a line of wood glue along one piece before screwing the two pieces together using wood screws. 


{Don’t over-do the glue, otherwise it’ll be squirting out all over the place when the boards are fit together.  If that happens, just use a damp cloth to wipe up any excess...and possibly sand it off after it’s dry.  If you are staining the wood, excess glue might keep the stain from soaking into the wood in some spots.  Yes, I’m speaking from experience.  Just keepin' it real! ;)}

After the 1 x 4’s were attached, I ran another line of glue along the 1 x 4 before hammering in 4 evenly spaced finishing nails into the 1 x 2 to attach it to the front of the shelf.  If you have a nail gun, it would greatly come in handy for this step, but you definitely don’t need one.  A hammer worked just fine.


Just like the Shanty girls, I didn’t mind that you could see the finishing nails along the front of the 1 x 2 because I was going for a rustic look...so I didn’t worry about sinking the nails below the wood and filling any holes.

Once I had both shelves put together, I applied two coats of Minwax’s Dark Walnut stain.


Over the next couple days I let everything dry and removed the frames from the wall.  I filled in any holes or dings and touched the paint up to prep the wall for the shelves.

Once I finally got around to hanging them, I pre-drilled holes in the shelves and in the wall.  I tapped some plastic anchors into the wall, and then used long screws to go right through the ledge and into the anchors in the wall.  I don't mind that the screw heads are exposed because you can't even see them with all the frames I'm displaying!  You'd never even know they are there.


I was a little apprehensive about how this project would turn out, but I really love the statement the ledges make in our dining room.  They truly are shelves that anyone could build.  You should try too! ;)

Monday, January 28, 2013

Winter Mantel.

Hubby and I want to start a new trend.  We are determined to make it totally acceptable to keep Christmas lights up throughout the winter.  And no, I’m not talking about our icicle lights hanging from the gutters. ;)  I am referring to the lovely glow that indoor Christmas lights create in a space.  We had so many lights up during the holidays that after we took everything down, it never felt quite right without that cozy factor during the dark winter nights.  We missed it like crazy.

My solution for our dilemma?  Decorate our mantel in a wintery theme, and buy a strand of white lights to give us our cozy back!  {I couldn’t use the strands of white lights I already had from Christmas...the cords on those were green, and they would have stuck out like a sore thumb.  I needed white to work with my winter theme.}

To begin the process, I wanted to transform the mirror we already had on our mantel.  The size and pattern of the frame was great, but the plastic-ish, black color just didn't do it for me.  I tried to remove the frame, keeping the mirror in tact.  I was going to use some 1 x 5's I had cut down at Home Depot to create a new frame, but for the life of me, I could NOT get the frame off of the mirror.  They used some major league, permanent adhesive on that sucker.  So it was on to plan B...spray paint.

You saw me priming the mirror here {when I transformed the quatrefoil mirror from Tar-jay}.  I'm not sure if it was the weather, or if I didn't clean the frame up enough, but the spray paint didn't seem to stick that well to the beaded part of the frame.  After one coat of spray primer, I decided to switch to my tried and true Behr Paint and Primer...in white semi-gloss.  It gives great coverage, and I already had an entire can of it leftover in the basement from when we painted our trim.  {Free = awesome.}

I painted several coats and after a few days of curing, I put the mirror back up on the mantel.  Hubby and I both agreed...we loved it 10 times more in white.  It was much more “us”.

With the mirror back in place, it was time to add some accessories from around the house, some snowy branches I found at the grocery store {Stop & Shop's floral department has some great things at even better prices} and the pièce de résistance...the white lights.

I am super happy with the mantel and we adore the light it casts at night.  Until we can get a gas fireplace installed, string lights will give us the ambiance we want at night, and for a WHOLE LOT LESS money. ;)


Anyone else want to jump on the “use Christmas lights allllllll throughout the winter months” bandwagon?!?  Come on.  You know you want to! ;)  Or do you think we are being totally tacky?  You can be honest. 

Wednesday, January 23, 2013

Winter Wreath. {Say That 5 Times Fast.}

Check me out...I totally just legitimized myself as a blogger.  Okay, not even close...BUT I definitely completed some sort of blogger “rite of passage”.  I made my own wreath!  Woot woot!

I was really trying to get this done as a holiday project...heck, I even bought two wreath forms because I was certain I’d have time to make one for me and one to bring up to my sister’s as a house warming gift.  HA!  It just didn’t happen.  I should have known that if I wanted one done for the holidays, I should have started well in advance.  Oh well, there is always next year, right?

So I was left with two blank forms, and lots of felt.  What was I to do?  Welp, make a wreath for a wintery mantel, of course!   Adding a little something to the mantel could help to combat the inevitable post-holiday-décor-blues!

I wanted a wreath that was grey and white, and well, wintery.  I wasn’t exactly sure what to do until I saw Mallory's wreath. 


It was a total inspiration for me.  So I headed over to Michael's, picked up some varying sized pearls and got to business.


I cut charcoal grey felt {that I already owned} into strips.  I wrapped them around the form in an overlapping pattern, hot gluing things in place as I moved along.


Once the felt was done, I started gluing various sized pearls in a random pattern on the wreath.  I didn’t have a method, I just went with it and tried not to think.  When I formed a big enough cluster, I used a couple of the smaller sized pearls and glued them around the outskirts of the main cluster.


Then it was time to add a ribbon to the top so I could hang it from my mantel mirror.  I tried white ribbon first, but it was just too bleh.  I knew the tiffany blue ribbon I used to DIY a bunch of stuff for our wedding would be perfect, so I dug through some old supplies and found just what I was looking for.  The ribbon may be a little wrinkled, but it’s nothing a little ironing can’t fix.  {Clearly, I have been too lazy to bust out the iron to fix the ribbon...maybe I'll get to it one day.  For now, just ignore it in the picture. ;)}


I really like how my very first wreath turned out, although I'm not sure it stands up to the beauty that Mallory created! :)  Head on over to her and Savannah's blog to see more of the awesome things they do!

PS - In the last picture you can catch a glimpse of the other mirror that I was priming on the back porch.  Hopefully I can share that makeover, along with my winter-ish mantel, very soon!

Tuesday, January 22, 2013

I Love Goooooold.

And I love Tar-jay.  I can’t go in there without spending two times the amount I thought I would when I first decided to go there.

Case in point?  I went to look for a lamp shade to replace one in our bedroom that I mayyyy have splattered with paint while hammering a lid shut after painting our bedroom for the millionth time.  As I navigated my way through the store towards the lamp aisle {I’ll get back to lamp shades in another post ;)}, I had to pass by numerous pretty things.  I forced myself to stroll on by the first time around, but I caved when passing them by for the second time.  This shapely lady ended up in my cart.


I wasn’t the biggest fan of the plastic-ish black frame, but I knew that could easily be fixed with some gold spray paint I already had on hand.  {Yup...the same paint I used to make this cheap art for our bedroom.}

The conditions around here aren’t ideal for spray painting, but one Saturday the temps happened to reach the mid-40’s, and I decided to live on the edge and set up my spray painting shop on our back porch.

One quick coat of a spray primer...


Then two quick coats of gold...

And I was left with this.  I’m.  In.  Love.


Not too long ago, I would have never thought mixing metals would be my jam...now, I’m obsessed.  I love the un-matchy-matchy feeling of it.  Anyone else enjoy mixing it up?


I'm linking up to:

Friday, January 18, 2013

Guest Posting at 52 Mantels!

Happy Friday everyone!!  In case you guys haven't had your fill of our living space transformation, head on over to 52 Mantels to check it out again!

And if you had enough of those pictures {I don't blame you ;)}, head on over there to check out everything else on Emily's awesome blog!

Have a great weekend! :)

Thursday, January 17, 2013

Cheap and Easy, Again.

When I re-arranged our bedroom {the first time}, I created some cheap and easy art to hang on the walls.  It served it’s purpose, but since I got all wild and crazy a few weekends ago, I needed some new art to fill different blank spaces on the walls.

Simple and inexpensive solution?  Go into our ugly basement, dig out some cheap canvases I purchased in bulk from Michael’s months ago, and get my Picasso on.

The canvases I had on hand were 12” x 12”, so I knew I’d need a grouping of 4 to fill the space I was working on.  I used some metallic gold spray paint I already had to cover each canvas including all the sides.  {So it didn’t stick to the floor, I sat each canvas on a small paint tray.}  Normally, I would never spray paint something indoors, unless I was in a VERY well ventilated area.  But since 1) it’s the middle of winter, 2) I’m impatient and 3) I just wanted to get this project started, I went against my better judgment and quickly got the job done.  I used even, light coats, and each canvas was done after just a few minutes.


{FYI, I turned the heat off before I started spraying to keep the fumes from possibly traveling to other parts of the house, and then I opened the windows and doors in the basement after I was done for about 30 minutes to let everything air out.  Easy peasy.}

After the spraying was done, I let everything dry, and I didn't return to it for a few days...because I'm a crazy person and like to do a million projects at once.  I can't help it.  I get all these ideas in my head and have to just go with it!

Once my project ADD subsided and I found my way back to my bedroom art, I sat on the couch and taped off different stripes all over each canvas.  I didn’t measure anything, and just eyeballed the spacing.  After each canvas was covered, I went over all of the lines with a credit card to make sure they made good contact with the canvas.


Then I headed back to the basement to find some leftover paint from the accent wall in our bedroom.  I got out a small foam roller, and rolled away.  While the paint was still wet, I carefully peeled off all of the tape, and left the canvases to dry.


After a few days {that dang project ADD}, I got out my trusty 3M picture hanging strips and stuck one to the back of each canvas. 


Then I stuck each canvas on our bedroom wall, and voila!  More cheap and easy art for our house!  I love that I didn’t have to go out and buy one thing for this project...everything came from our basement or one of our closets.


So there ya go...round two of my cheap and easy art! :) 

Monday, January 14, 2013

Main/Guest Bathroom Curtain.

I finally got around to sharing our {winter-ish} living/dining room curtains, and now it's time to show you guys the window dressing we made for our main/guest bathroom.  I absolutely love the geometric pattern on this fabric, and I especially love how it plays well with the thick stripes painted on the walls.

Momma dukes and I made this one the same way we created the curtain for the kitchen window.

I really think it adds a little something that was lacking in this space.  I tried searching for a picture of the window straight on, but I couldn't find anything.  I'm assuming it was because the picture would have been ridiculously boring, so I decided to spare you guys.  Here is the best "before" of the window that I could find...


And as I warned you in my previous curtain post, these pictures aren't the greatest.  I just can't take a picture of a window on a sunny day...the brightness, the colors are off, it's just a mess.  But work with me people!


I'm a huge fan of how this turned out!  And we even added a few more little touches to this space over the holidays {I'll share soon}, so this bathroom is finally starting to feel "finished"...after only a year HA!

Friday, January 11, 2013

Striped Curtains.

In a holiday prep post, I mentioned that one thing on our to-do list was to make some new curtains for our living/dining room and for our main/guest bath.  I know it’s a little crazy to add such a project into the mix because taking care of all-things-Christmas leaves us busy enough...but I had my momma visiting, so it only made sense to tackle a sewing project.  {She’s the best.}

We started with the long panels for our living/dining room. 


Just like when we made these curtains...we cut our fabric, pinned the seams and fed it through the machine.  This fabric gave us a little bit of an issue until my mom figured out the right settings to use.  Shockingly, it was thicker and tougher to go through then the heavy houndstooth stuff I found for our winter runners.

After a lot of hard work, it was time to hang ‘em up and check ‘em out.  {Please forgive my lack of photography skills...I simply use my iPhone and CANNOT, I repeat CANNOT, shoot towards a window when the sun is out.}


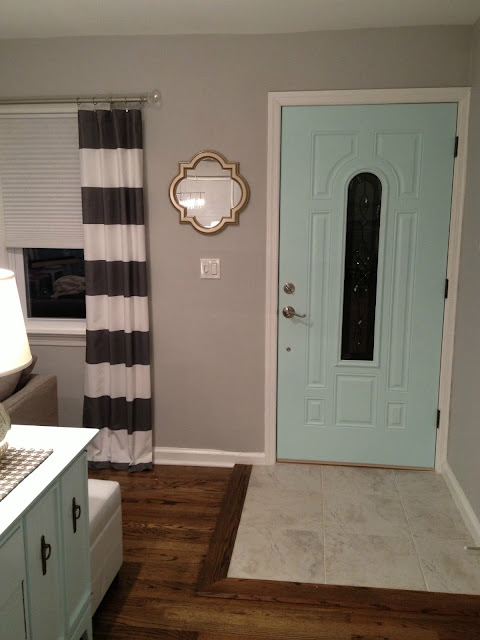
I love how the dark stripes make a statement in the room.  I wasn’t feeling the spring-ish pattern that we had up during the winter months, so this was just the change I was looking for!  I’ll have to show you guys how the curtains look without our Christmas décor up...but I have not yet put our house back together after taking all our Christmas stuff down on Sunday.  Poor hubby ended up getting the flu/stomach bug this past week...so decorating and blogging has taken a backseat {as my Insta-friends can vouch for...I mean, our new rugs have even arrived, and I have yet to bring them up from the garage because hubby is priority #1}.

So what do you guys think of switching out curtains based on seasons?  I know I’m kind of a freak for doing it, but I couldn’t help it.  I love to switch things up!! :)  And for anyone else out there battling this horrendous cold/flu season...I FEEL FOR YOU, get better ASAP!! ;)

PS-can't wait to share more updates with you guys...main bath updates, master bath stenciling, what our big delivery was, master bedroom re-arrangement, DIY art...