Thursday, August 28, 2014

Blogger Stylin' Home Tours - Favorite Room Edition

I am super excited to be a part of another Blogger Stylin’ Home Tours series this week!


Lindsay from The White Buffalo Styling Co. hosted two other editions here and here, and now it’s time for us to share our favorite rooms!  If you are visiting from Just a Girl, hellooooo and welcome!!  I hope you like what you see! :)

My absolute, hands down, favorite room in our home is our "great room".  When we purchased our fixer-upper, this space was closed off, dark and dingy.  We quickly changed that during our main floor reno. Now, I can't help but love the bright and airy vibe in this space.  The many windows flood the room with light and show off great views in every direction.


And although the room has an open layout, it still feels oh-so-cozy...thanks to our over-sized barn door and freshened up fireplace.  There is no place I'd rather retreat to at the end of the day.


For quite some time I have been trying to come up with a great way to label my style, but I just can't put my finger on the exact description.  Our home is a bit eclectic, fun, budget-friendly and comfortable, with a touch of glam.


I like to keep the price tags low, and the impact high.  I have no problem spending a smidge more on large neutral pieces (like our sofa and dining table) and then working in a ton of Craigslist makeovers (like our buffet, console dresser and dining chairs), discount finds and DIY projects (curtain rods, curtain panels, wood shelves, art) in bright colors and bold designs.


I hope you enjoyed taking look around my favorite room, and don't forget to keep the BSHT series going and head over to Eleven Gables! :)


*****************************


Full Tour Schedule:

Monday, August 25th:
Tuesday, August 26th:
Wednesday, August 27th:
Thursday, August 28th
Friday, August 29th:

Tuesday, August 26, 2014

Parima Studio - 2014 Rose Collection

Do you guys know Patricia Vargas?  If not, you should.  She is the extremely talented owner and artist behind Parima Creative Studio.  Her work is so beautiful and inspiring.  She has everything from original paintings to graphic prints to fine art prints.  And lucky for us, she just launched her 2014 Rose Collection.


Right now she is offering 15% off all the prints in her shop with the coupon code PSROSE15, and if you head over to Victoria McGinley Blog you can enter to win $250 to Parima Studio!!

I'll just say, you're welcome. ;)

Monday, August 25, 2014

Elegant Black Porch Door (& Winners!)


A little over a year ago I was introduced to an awesome company called Modern Masters.  The kind folks there asked if I wanted to review their metallic paints, and I jumped at the opportunity!  I loved getting to use their product, so when they approached me about trying out their new front door paint, I couldn't say yes fast enough.

But there was a catch for me...I didn't want to use the paint on our actual front door.  Instead, I was itching to give our back porch door a makeover.  You see, I've been mentally sprucing up our back porch for well over a year now, and getting the porch door painted would be step one of the vision actually coming to life.

So I scanned through the 24, yes 24, amazing color options available and chose Elegant...a rich, classic black.  I wiped my door down so it was free of dirt and lint, and taped off the edges of the door.  Per the directions on the container, since my door was previously painted, I could start painting without priming. Modern Masters boasts that it takes only two coats for full coverage, but I was skeptical...especially since I was going from white to black.

(I skipped taping off the windows, and decided it'd be easier to scrape them with a razor after.  Clearly, I hate taping.)


Here's where I started (booooooooring)...


After coat #1 (I was a bit scared)...


After coat #2 (that looked a little better)...


After coat #3 (almost there)...


And one final coat for good measure (nailed it)...


Although it did take me 4 full coats to cover the white door, the results were worth it.  The paint dried quickly and has a beautiful satin finish that really pops against our home.  The paint was also easy to scrape off the windows.


If you are antsy to revive your entrance, but scared to take the plunge, you can download Modern Masters' free iPhone and Andriod app to instantly see the transformation this paint can make for you.  And once you fall in love with a color, visit select Lowe's and Ace Hardware locations, or go online to Amazon.com and Modern Masters to purchase!


***I was not compensated for this post.  All opinions are 100% mine!!***


*******************************


Winners of the Paisley Print giveaway have been announced here.  Check your email ladies! :)

Friday, August 15, 2014

Paisley Print Boutique Giveaway!

I'm taking the blog a bit off course today.  99.9% of the time I use this little slice of the web to talk about all-things-home/DIY/design related, but today I'm talking about another love of mine...jewelry!

If you follow me on Instagram, you already know I adore jewelry.  Okay, that's putting it lightly.  I fully admit I have a mild problem obsession, but I can't help myself.  I <3 jewelry and fashion...just as much as I love everything-home!

Luckily, this embarrassing Instagram-over-share of my wardrobe caught the attention of a good blog friend, Jen, who reached out to see if I wanted to collaborate with her and help spread the word about her uh-mazing shop, Paisley Print Boutique.  


Ummmmm, yes!!  I was ready to shout about PPB from the top of my lungs...because not only does her shop carry a variety of beautiful goods (I'm talking soap to scarves to paper goods to jewelry to art), but it is making a difference in people's lives.


Several years ago, Jen spent a year on the international mission field.  She worked with many individuals all over the world...from women who were victims of sex-trafficking crimes, to HIV-positive, single-mothers who were trying to support their families in Kenya, to girls who were abducted by the LRA in Uganda. Now, even when she's home in the states, she is able to help those in need through PPB.  

Jen graciously allowed me to pick a few things from her shop.  I fell in love with a pair of Raven + Lily gold leaf earrings and a beautiful necklace from Miriam Designs.  I couldn't wait to wear these pretty things, and I was even more excited when I opened my envelope and saw the adorable packaging she wrapped them in!


It's wonderful when you can use or wear something that doesn't only look good, but makes you feel good, because you know you are making a difference in someone's life.


Now for the exciting part...there are TWO $50 Paisley Print Boutique giveaways up for grabs!!  To enter, just use the Rafflecopter widget below.  And if you can't wait that long to get your hands on some PPB goodies, you can save 20% (today - August 29th) by using the code RetroRanchFriend.  Good luck, friends!!

a Rafflecopter giveaway

****My usual disclaimer...I was not compensated for this post.  I just think Jen and PPB rocks so I wanted to spread the word and share the love!!****

Wednesday, August 6, 2014

Accent Wall Sneak Peek!

Alternate post titles....1) a bunch of pictures that are so far from being Pinterest-worthy or 2) real-time, real-life makeover....

A few posts back I mentioned I was in the middle of making over our bedroom for the millionth time.  I showed off our TV gallery wall that was (ahem, I mean is) 99.9% complete and I'm here to share another project for that room that isn't quite finished...but it's oh-so-close!

This was a project that both scared and excited me.  It's been floating around in my head for a very long time (for real...this makeover has been underway, mostly in my head, for almost a year), but I kept going back-and-forth on it.  Going forward would mean painting over my beloved Balmy Seas and tackling a stencil project on top of that.  {You would think I'd be sick of stenciling after this, this and this...but nope, I'm still smitten with the results.}

I realize I was hemming and hawing over something that was just paint, and if it didn't work out, I could just get more beautiful blue-green paint, sand down the stencil and repaint my wall, AGAIN...but to be honest, the thought of putting all that work into something I could totally hate didn't sound like fun.  Time is so precious, and I have about one million other DIY projects to tackle! ;)

So I put the project off for months, but it never disappeared from my thoughts.  I took that as a sign to stop being scared and lazy.  I needed to get the idea out of my head and onto the wall to see if I would actually like it.

Spoiler alert, I didn't like it, I loooved it!  And thankfully, hubby did too.

We started here.


(Those super cool wall decals are from the amazing Julia!  You should check out her shop...she's on vacation now, but will be returning soon!)

The decals, mirror and DIY lucite curtain rod came down, and it was time to paint.


I liked it when it was done, but I'm not going to lie, I was a little skeptic.  I think I was used to having a pop of something...and now there was just a whole lot of gray going on.  Gray walls, gray lamps, gray bed frame, gray bench, gray rug.  I semi-freaked, but then reminded myself to keep moving forward because I will be swapping a few of those gray items out of the room and I have grand DIY-makeover plans to add in the much needed "pop" that was now lacking in the space.

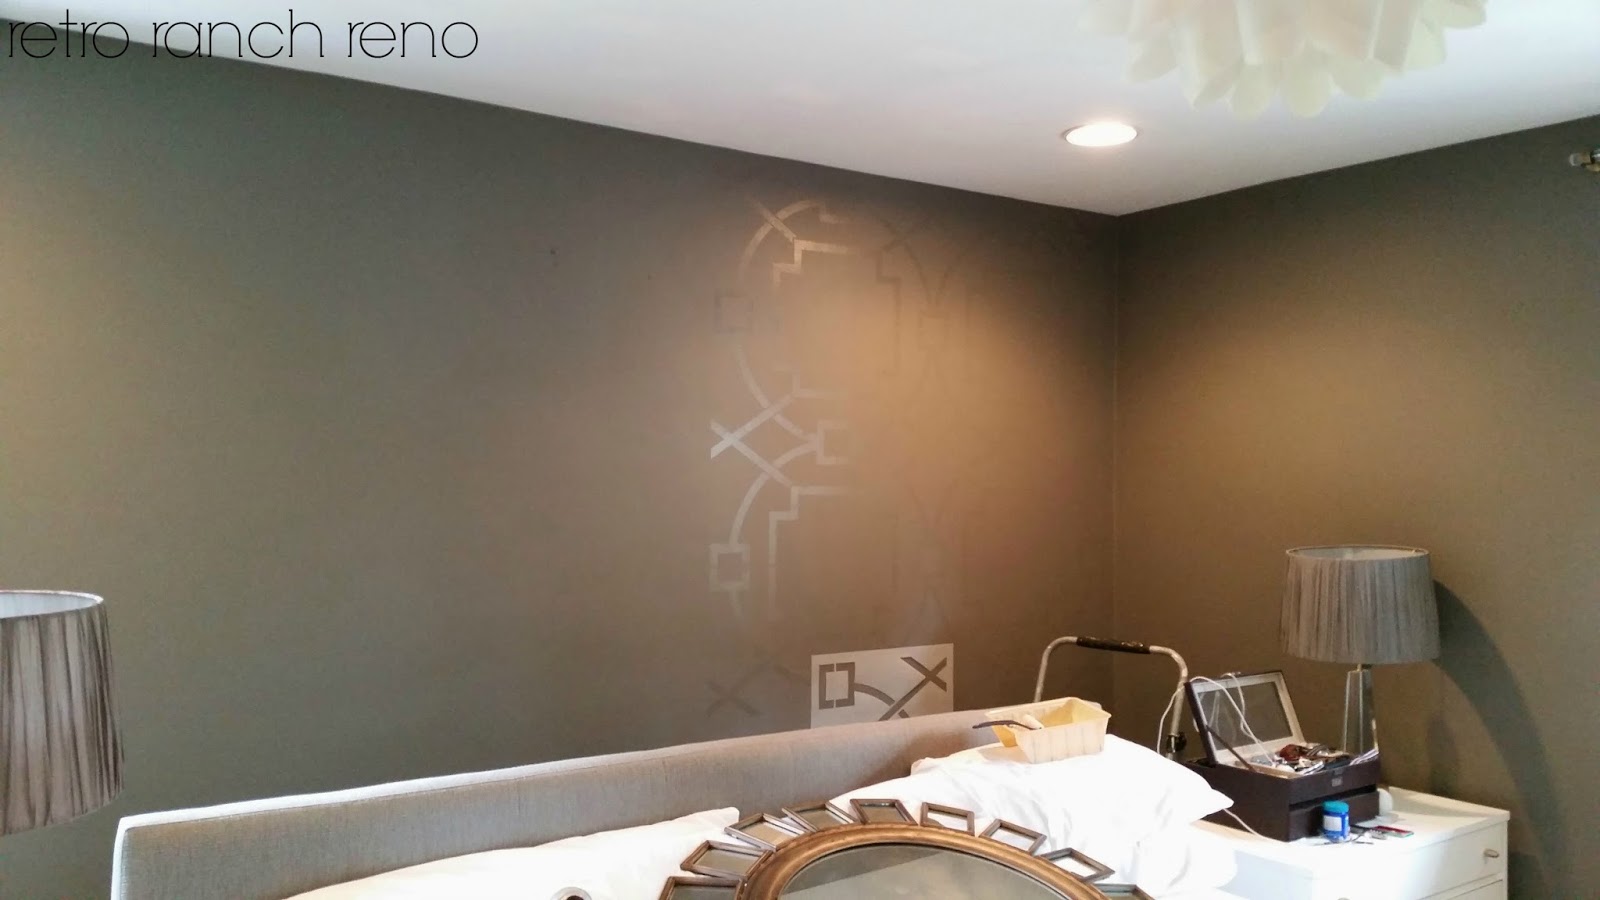
After the wall was dry I assembled the tools to get my stenciling done.  I dug out an amazing stencil I purchased from the very talented Sarah (ummmm, last July!!!), a small container of Minwax's Polycrylic in Gloss, some Krylon spray adhesive, a drop cloth, small paint tray and small foam roller.


In my head, I envisioned this stencil to have a gloss-on-matte, wallpaper-ish effect.  The paint I used on my walls was a flat finish and instead of buying another can in a gloss finish, I headed to our basement and grabbed a small container of gloss polycrylic I had on hand.   Yay for being cheap thrifty!

After the first pass, I was nervous.  Since I was using polycrylic and not paint, the pattern looked AWFUL when it went on.  Instead of panicking, I pretended it looked fantastic and continued my second pass with the stencil. Thankfully, by the time I finished the first two passes, things were dry, and the light was bouncing off the glossy design, just as I had hoped.  It was a success!!


And here's a peak at the whole wall covered.  


I just have a few tiny things to touch up, and then I'll be able to officially cross this project off the "master bedroom refresh" to-do list!!

Anyone else have a mid-way project freak-out?!  Did it turn out okay in the end??