Showing posts with label Royal Design Studio. Show all posts

Friday, November 15, 2013

Evolution of Our Hallway.

For just being a hallway, ours has undergone quite a few changes in the short time we've owned our home. First and most importantly, we knocked down quite a few walls to create our open floor plan.  


Then once that happened, I knew I needed to spice up the blank slate.


I added a stencil...quite a daunting task for a first time stenciler, but boy was it worth it!


Then I added some much needed frames.  I thought that was good, but quickly realized it was still lacking something.


So I decided to add a lot more frames to create four mini-gallery walls.  I now realize I only showed off the first gallery that went up...and after that I lost steam on the project.  The frames were up for quite some time, but I never got around to filling them with meaningful art, words and photos.  {Please tell me I'm not the only one who moves slower than molasses at that task!!}


After my gallery walls were up, I surely thought our hallway was almost done.  I just needed to fill the frames find the perfect mirror to hang where my current "place-holder" mirror is.  Ohhhh, if only that was the case. ;)

To be perfectly honest, I just wasn't feeling the pattern I put up in the hallway anymore.  Don't get me wrong...I really did love it when it first went up!  At that point in time, it felt like a big risk to put a pattern up over our entire hallway.  I loved the extra something it added, but as time passed, I realized it wasn't enough for me.  My style is constantly evolving, and along with that evolution, I seem to gain courage to take more risks and try new things.

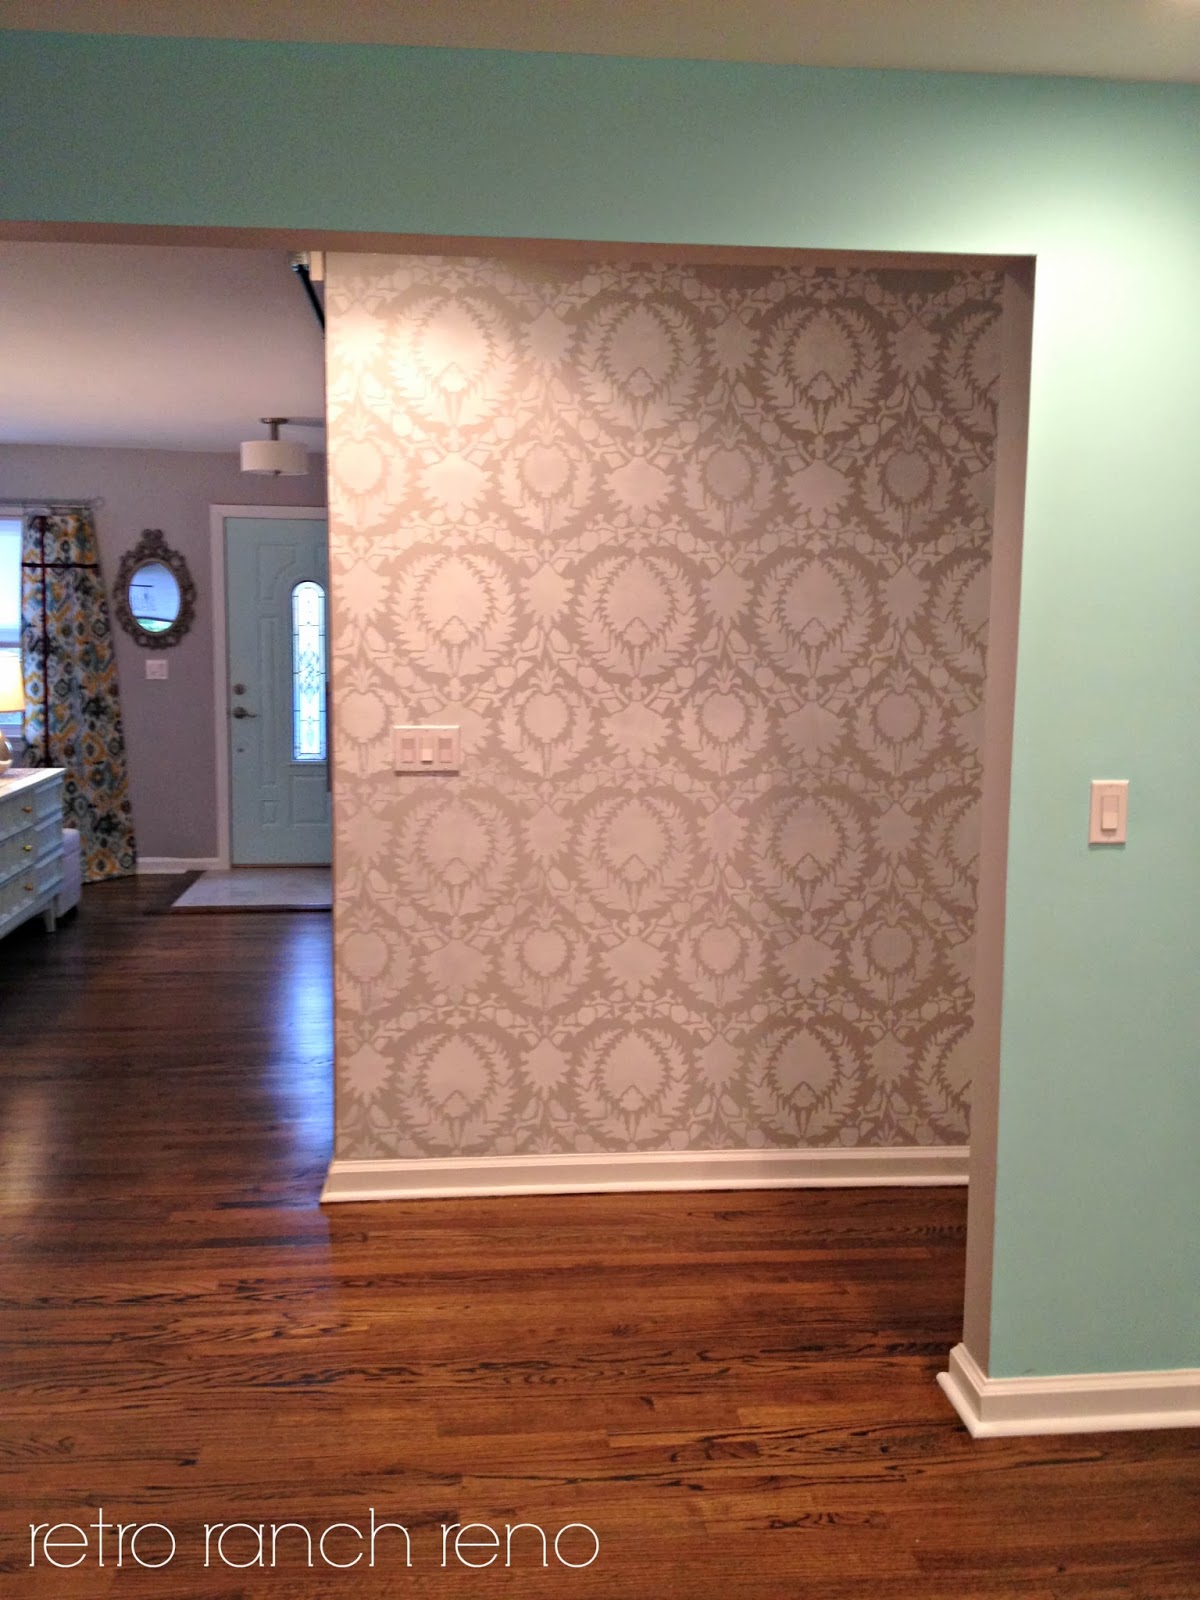
I was craving more.  I wanted a bold statement in our hallway, and after seeing YHL paint their floor, I knew the exact pattern I was searching for...Royal Design Studio's Suzani Silk Road.  

I placed my order the same day YHL's post went live, and I couldn't wait to paint over our stenciled hallway to give me a fresh new canvas.  Who would have everrrr thought I'd say I was happy to paint over something that took me 9 hours to complete?!  Certainly not this girl!!!

Shockingly, I didn't cringe on bit as I covered up the pattern.  {FYI...if I wasn't putting such a busy pattern over my previous stencil, I would have sanded the walls down before painting over it to make sure everything was smooth and there was no trace of the stencil left.  I took a risk not doing this, but I figured my bold pattern would be forgiving...and it was, phew!!!}  It took two coats to cover {mostly because I used a semi-gloss white paint for my stencil the first time around, but soon I was ready for my new pattern to go up!


I stuck with Behr's Gentle Rain as the base coat color for the hallway.  It's the same color we have in our living/dining great room, and it reads as a "true" gray on the walls in our house.  I used Behr's off-the-shelf ultra white paint in a flat finish for the stencil.  This stencil was quite time consuming and took twice as long as the first stencil I used.  The main reason for the added time was that I could cover the entire wall {top to bottom} with two passes of the first stencil since I bought it in the "professional" size.  This stencil took 4.5 passes because of it's size, and that meant I needed to wash my stencil twice because of the paint build up. Grrrrrrrr.....

Yes, my stencil got a bubble bath {with hot-ish water and dish soap}...which was quite effective in removing the paint and keeping all of the tiny pieces from bending out of shape. :)


This hallway project was quite the task to take on {I completed it during two days off from work}, but just like my first experience...the results were SO worth it!!!  I cannot wait to get some frames back up and complete this hallway! :)


Happy Friday, friends!  I hope you all have a great weekend! :)


Wednesday, July 18, 2012

F.O.S. {Fear Of Stenciling}

My apologies for my long absence from the blog world.  My life has been quite hectic lately, so the blog had to take a backseat for a while.  :(  But I am so happy to be back, and even happier to share a project that I wrapped up a couple weeks ago.  It is by far one of my favorites, and definitely one that I was terrified to take on.  {For those of you who follow me on Instagram, retroranchreno, you've probably already guessed which project this is. :) }

For quite some time it was very apparent to me that I needed to spice up our hallway.  It was a whole lot of wall space, with not a thing going on...and since part of it can be viewed from pretty much every room in our house, I knew I needed to add some interest.

My first thought was to create a ginormous version of the very popular gallery wall.  Ultimately, I decided against it because of the small gallery wall I already hung above our buffet {which reminds me that I have not shared it with you guys...ohhh boy, am I behind in my sharing!!!}, and I didn't want to put something together that would make our open hallway feel heavy or crowded.

So on to my second thought...using paint to put a fun pattern onto the walls.  Thick, straightforward stripes?!?  Nah, I already did that in the main bathroom.  A cool Moroccan tile pattern?!?  Definitely.  But wait...that meant I'd have to tackle stenciling, and for whatever reason...stenciling intimidated the heck out of me!

Fear aside, I couldn't get the thought of fixing the hallway up out of my head.  I kept browsing Royal Design Studio's website for the perfect pattern and I always found myself checking out the Moroccan Stencils section.  I have quite a few favorites in there, and I was able to narrow it down to the Moorish Trellis.  My choice was perfect since I wanted to avoid anything too small and intricate.  A crazy, busy hallway is not the look we were going for.

And even though I am CLEARLY not a professional stencil artist, I took a risk and ordered a "pro" sized stencil.  I was willing to pay the extra cash {$98 vs. $44 for a standard size} for a larger stencil so I could minimize the amount of times I'd have to put the stencil up on the wall.

My stencil arrived quickly, and then just sat in the corner of our bedroom for a month or so.  I finally found the motivation {and mainly, courage} to start this project after my parent's came for their visit earlier this month.

Here is the best "before" picture I could come across.  Of course, I forgot to take a proper one...so this oldie, but goodie will make do.


I started out by spraying the back of my stencil with some Easy-Tack spray adhesive I purchased from Michaels.  I started the spraying process on our back porch and eventually moved it to our great room floor.  I just used a drop cloth underneath the stencil when I needed to reapply.


I was a little nervous about how well the spray adhesive would hold, but it worked well.  I didn't even need painters tape for the first half of the project.


I coated everything in paint.


Ta-da!  One section done....a million to go.


I decided to do the top half of all the walls first, and then go to the lower half.


The paint did bleed a bit under the stencil since I wasn't "truly" stenciling with a proper stencil brush...but I don't mind.  I used a small roller and it went much more quickly that way and still gave me the effect I desired.


 Onto the lower half....


And after 9 hours of work...I was done, and obsessed with the finished product!  It was just what me and the hubby wanted.  {Please forgive my blurry, awful iPhone pictures.  I could not find my camera for the life of me...not like that would have made a difference in the quality of my photography hehe.}


Love this view from the kitchen now...


It's a little hard to capture the pattern throughout the entire hallway in photos since it's a subtle color difference, but the appearance in real-life is perfect!


And I love how our mirror at the end of the hallway reflects the design beautifully.


What do you think?  Worth the full day of work?  I definitely think so! :)