Showing posts with label master bedroom refresh. Show all posts

Wednesday, October 7, 2015

Our Master Bedroom - The Billionth Reveal.

Ohhhhh, our master bedroom.  It's the room in our home that has never felt quite right to me.  I've painted (and re-painted...and re-painted again), stenciled, swapped out furniture (twice), rearranged the placement multiple times and made poor hubby mount and un-mount our TV too many times.  Every time I thought I'd be "done", I just felt unsettled.  And that is NOT a feeling you want for the space you are supposed to unwind in every night.  Finally, after "refreshing" it for probably almost two years, I'm finally feeling content.  And before the feeling fades, I figured I should get some pictures posted to show the "reveal".


There are a few things that help "make" the room for me...

1) My gloss-on-matte stenciled wall now competes with our hallway for my favorite stencil project, ever.  I love the statement made by the subtle pattern.  You can purchase the stencil from Sarah's Etsy shop here.

2) My fabulous pillows!!  If you are searching for a great pillow source, you have to check out Priscilla's Etsy shop, MotifPillows.  She has the best stuff!  Her radiant orchid and animal print covers worked so well with the older aqua pillows I found at Target.

3) The stunning Lamps Plus sconces that now flank our bed.  I'm no stranger to Lamps Plus.  I purchased a few items for our home from their website when we completed the major reno of our first level.  In fact, one of the most common email questions I receive is where to find our master bedroom ceiling fan/light combo.  (And in case you are now wondering, it's the 52" Casa Optima White Flower Ceiling Fan.)

Lamps Plus has the most amazing selection to look through.  I can (and have) spent hours browsing their options.  And the minute I laid eyes on our brass beauties, I knew they would be perfect for our room.  They have me smitten!

4) Our Rugs USA Windsor Overdyed Grove Rug in violet.  I already knew I had a soft spot for this rug.  Quite some time ago, I purchased the turquoise version to for our living room.  It created the perfect pop of color in that space, and when I realized I wanted to make a similar statement in our bedroom, I knew where to look.  I headed back to the RugsUSA site to find a pinky-purple version of the overdyed rug.  It's like it was made for our space!

Now, fingers crossed this will be the last "reveal" for quite some time. ;)

Wednesday, February 11, 2015

Leaner Mirror Makeover.

Once our walls went dark, I really fell out-of-love with our large leaner mirror.  It blended in with the walls and didn't provide any pop.


I solved that problem the same way I solve 90% of my other problems....with some leftover paint!!

For our master bedroom refresh, I knew I didn't want to completely rid our room of my signature teal color, so rather than have an accent wall covered in Behr's Balmy Seas, I wanted to incorporate it using accessories and accents. That gorgeous shade of teal would be the perfect hue to make our old mirror come to life again.


I took it outside, spray primed and painted it with a leftover paint sample.


Once that was done I got out my Citri-Strip gel, coated the over-spray and used a scraper to clear the mirror surface.  (Yes, I was lazy and didn't want to cover and tape before I primed, so I had to strip later.)  After that, I used Minwax's polycrylic in semi-gloss to cover and protect the paint.


AnvoilĂ ...a new mirror!


I think it looks great against our dark walls, and all dressed up for the holidays... ;)


Can't wait to share more details soon!!!

Friday, February 6, 2015

Quick DIY Cork Coasters.

Here and there I've been working on our master bedroom refresh.  I promised myself and even declared to the blog-world that I would finish the space by the end of the year, but it just didn't happen.  I'm getting close.  As you can see here, it's all about the details now.  Once I check a few more things off my to-do list, I'll finally be D-O-N-E!!!

What's left, you ask?  Finding the right pillows (I've been on the pillow hunt for more time than I want to admit...I've fallen in love, but my budget never got the same warm and fuzzy feelings), DIY'ing some jewelry storage, pretty-ing up our exposed lamp cords (with paint or a DIY cord-cover project) and a DIY art canvas.

Since I've talked enough about what ISN'T done, let me prop myself back up on what I've actually finished: upped the cozy factor in our room with dark walls, installed our DIY lucite curtain rods, painted our DIY curtains, hung our TV gallery wall (sneak peek here), stenciled our gloss-on-matte accent wall (sneak peek here), hung our wall lamps, swapped out our focal point mirror, painted our old leaner mirror and DIY'ed some simple coasters for our nightstands.

You see, hubby and I drink a ton of water...and every night we each have a bottle or glass of water next to us in bed.  Normally I wouldn't be such a freak about putting a drink on a side table, but these "nightstands" are one of my favorite Craigslist makeovers I've ever completed.  


The thought of ruining one with a water ring makes me cringe.

So the easiest/cheapest/most-stylish solution I could come up with was painting a 4-pack of cork coasters from Michael's.

This project took all of 10 minutes, is embarrassingly easy and pretty much self-explanatory, so I feel silly even posting about it, but hey, I love how they turned out...so why not show them off?!

First, I gathered my supplies: 1) the coasters, 2) some left over paint samples and acrylic paints, 3) old paint brushes, 4) painters tape, 5) liquid gold leaf, 6) Krylon clear finish spray and 7) an old piece of cardboard to paint on.


Then I taped off different areas on the coasters and started painting!  I didn't have much of a plan for shapes or color placement.  I just crafted without thinking or measuring.


Once everything was painted, I used a Krylon clear spray to lightly coat each coaster 2 times to protect my award-winning paint job.


After the coasters dried, they were ready to go!  I love the colors and how pretty they look compared to the folded over paper towels we were using. ;)


High-five for super-simple, cheap projects!!!!  Happy Friday, friends! :)

Monday, September 29, 2014

Bedroom Puzzle.

Since we've lived in our fixer upper, I've been piecing together our master bedroom puzzle.  I thought I completed it, more than one time, but I was always wrong.  Pieces were missing or I was jamming the wrong shapes into the open gaps...

I'm not afraid to admit I struggle with this room.  I've painted and re-arranged it quite a few times in it's short life.  Yes, I've put a lot of effort into a room that still isn't done, but at least I can say I haven't settled for an "okay" space.  No ones end-of-the-day-retreat should be just "okay".

So I'm making a declaration for the whole world to hear...I will finish our master bedroom this year! I found the direction I want to go by stepping outside of my comfort zone (hello painting our room a dark color and then making it even darker by painting over my safety-color accent wall) and trusting my gut.  Plus, I have two big guns that are really helping my vision come to life.

One of those big guns is RugsUSA.  I've talked about them many times before (here, here and here) and have loved each and every rug I've purchase from them.  

Our master bedroom had been sporting a bold chevron rug for a while.  Here's a peek at it quite a long time ago.


The rug was the perfect punch in the room...untilllllll I decided to paint all the walls gray, and our bed frame is gray, and our bench is gray....and so, the gray print rug was just too. much. gray.  

Thankfully, I came across the perfect rug for our space while searching, where else but, RugsUSA! It's actually the the violet sister to our teal overdyed rug we have in our living room.  


At first I questioned whether I wanted two of the same rugs in our home, but that doubt quickly went out the window.  After all, we loooove our living room rug and the pop it makes in the space.  I was convinced this rug could do the same thing for our bedroom...as long as it was the right color.  Am I the only one who freaks until the rug arrives so you can see what the actual tone is in person?!

I held my breathe and ordered the rug.  When it arrived I was able to let out a huge sigh of relief because it was the perfect color!!

Once we were able to get it under our ridiculously heavy king bed (thanks neighbors!!), hubby and I gave it the stamp of approval.  


The rug makes us giddy when we step into our bedroom.  We couldn't be more pleased with the hue, and bonus, our cat doesn't scratch at it!!  Woohooooo!!

Hopefully it won't be too long before I share more of this space.  Like I said, I will be done with this puzzle this year!! ;)


****RugsUSA provided a rug for our makeover, but did not compensate me for this post.  All opinions are 100% mine!!****


Wednesday, August 6, 2014

Accent Wall Sneak Peek!

Alternate post titles....1) a bunch of pictures that are so far from being Pinterest-worthy or 2) real-time, real-life makeover....

A few posts back I mentioned I was in the middle of making over our bedroom for the millionth time.  I showed off our TV gallery wall that was (ahem, I mean is) 99.9% complete and I'm here to share another project for that room that isn't quite finished...but it's oh-so-close!

This was a project that both scared and excited me.  It's been floating around in my head for a very long time (for real...this makeover has been underway, mostly in my head, for almost a year), but I kept going back-and-forth on it.  Going forward would mean painting over my beloved Balmy Seas and tackling a stencil project on top of that.  {You would think I'd be sick of stenciling after this, this and this...but nope, I'm still smitten with the results.}

I realize I was hemming and hawing over something that was just paint, and if it didn't work out, I could just get more beautiful blue-green paint, sand down the stencil and repaint my wall, AGAIN...but to be honest, the thought of putting all that work into something I could totally hate didn't sound like fun.  Time is so precious, and I have about one million other DIY projects to tackle! ;)

So I put the project off for months, but it never disappeared from my thoughts.  I took that as a sign to stop being scared and lazy.  I needed to get the idea out of my head and onto the wall to see if I would actually like it.

Spoiler alert, I didn't like it, I loooved it!  And thankfully, hubby did too.

We started here.


(Those super cool wall decals are from the amazing Julia!  You should check out her shop...she's on vacation now, but will be returning soon!)

The decals, mirror and DIY lucite curtain rod came down, and it was time to paint.


I liked it when it was done, but I'm not going to lie, I was a little skeptic.  I think I was used to having a pop of something...and now there was just a whole lot of gray going on.  Gray walls, gray lamps, gray bed frame, gray bench, gray rug.  I semi-freaked, but then reminded myself to keep moving forward because I will be swapping a few of those gray items out of the room and I have grand DIY-makeover plans to add in the much needed "pop" that was now lacking in the space.

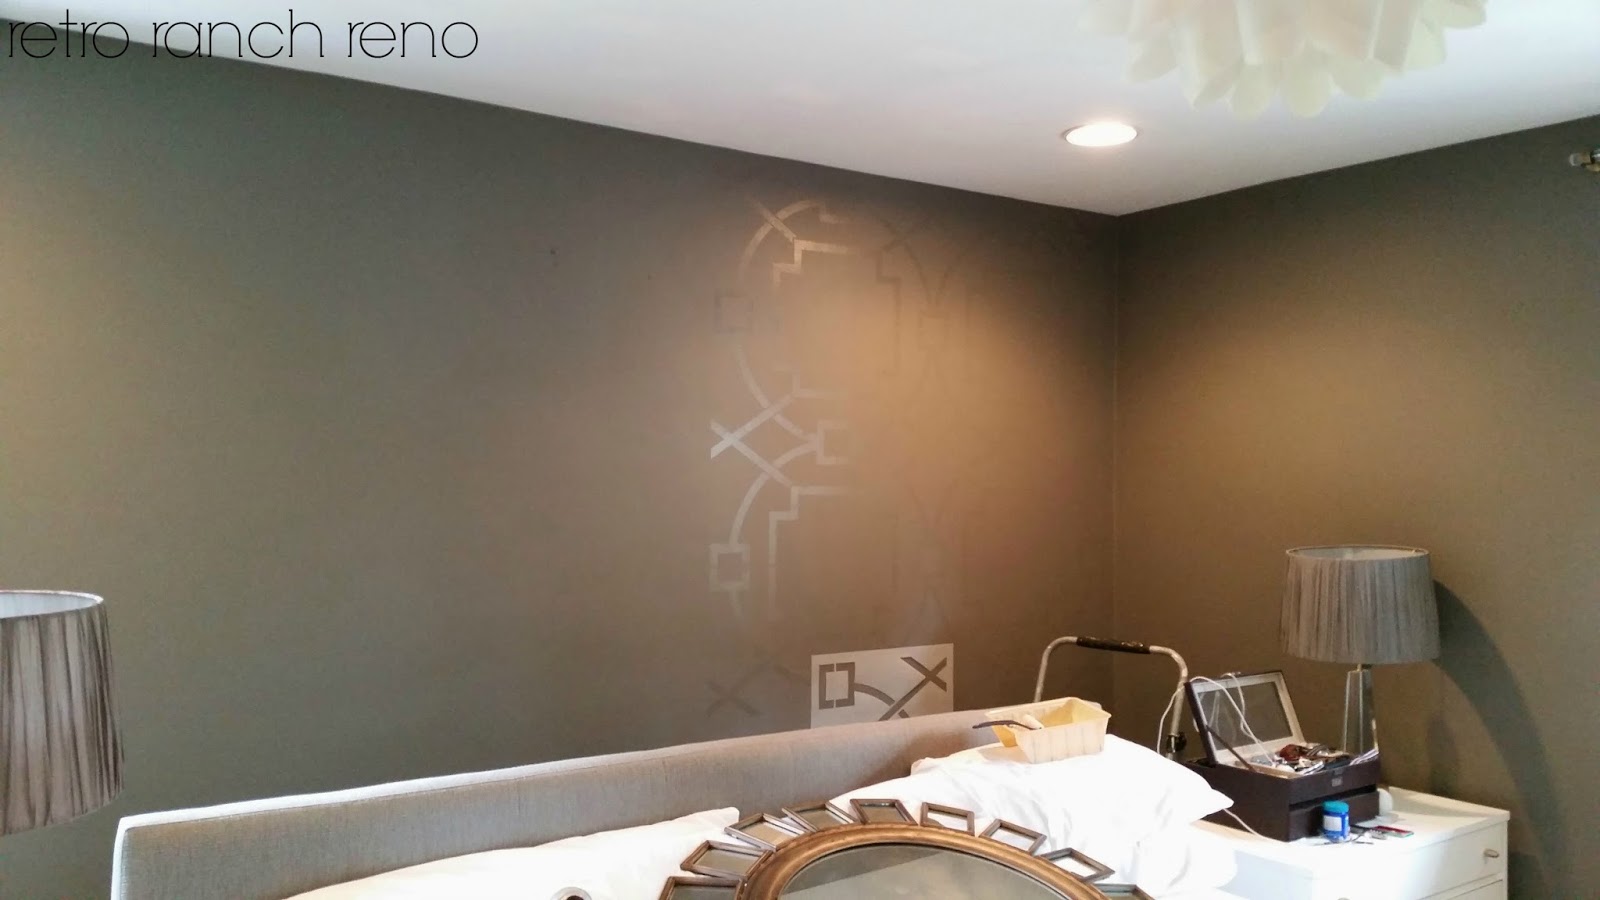
After the wall was dry I assembled the tools to get my stenciling done.  I dug out an amazing stencil I purchased from the very talented Sarah (ummmm, last July!!!), a small container of Minwax's Polycrylic in Gloss, some Krylon spray adhesive, a drop cloth, small paint tray and small foam roller.


In my head, I envisioned this stencil to have a gloss-on-matte, wallpaper-ish effect.  The paint I used on my walls was a flat finish and instead of buying another can in a gloss finish, I headed to our basement and grabbed a small container of gloss polycrylic I had on hand.   Yay for being cheap thrifty!

After the first pass, I was nervous.  Since I was using polycrylic and not paint, the pattern looked AWFUL when it went on.  Instead of panicking, I pretended it looked fantastic and continued my second pass with the stencil. Thankfully, by the time I finished the first two passes, things were dry, and the light was bouncing off the glossy design, just as I had hoped.  It was a success!!


And here's a peak at the whole wall covered.  


I just have a few tiny things to touch up, and then I'll be able to officially cross this project off the "master bedroom refresh" to-do list!!

Anyone else have a mid-way project freak-out?!  Did it turn out okay in the end??