Monday, September 21, 2015

Fall Home Tour - 2015

If you've been around my blog for a while, you know I love to decorate for the changing seasons...as in, loooove to do it.  In fact, some of my favorite posts (ever) were when I was a part of the Blogger Stylin' Home Tours.  They always gave me an excuse to play with new color schemes and freshen up the view.

I may not be a part of the BSHT this year, but that doesn't mean I've stopped decorating as each new season came along.  In April and May, I started a "before and after" series showing the progress we've made in our humble home, and if you checked out those posts, it's clear this spring and summer were all about the light and bright.  Aqua, coral, citron...oh my!

To simplify my seasonal swaps, I keep a consistent base all year round (blues, gray, B&W, mixed metallics) and swap out different shades and hues to breathe new life into our home.  This makes the process inexpensive and enjoyable.

Last fall, bright, almost neon, colors were my inspiration.  It was fun, vibrant and warm.  This year, I found myself drawn to all-things-purple...more specifically aubergine, plum and orchid.  (Fun fact, growing up...purple was my favorite color before turquoise stole my heart.)  These colors, as well as a few pops of mustard, really help to warm up the cool blues throughout our home.


Prior year decor, a few Michael's pumpkins and pinecones, spray paint, Behr paint samples, fabric and help from momma all made our home fall-ready this year.  I'm a big fan, and even hubby commented that it might be his favorite "look" yet!

Here's a million and one pictures...I hope you enjoy! :)


So...are you guys lovers of swapping out decor seasonally?  Or does #nobodygottimeforthat...believe me, I'd totally understand.

And in case you want to check out my other Blogger Stylin' Home Tour posts:

*Fall 2013*


****************************************

PS-I have not forgotten about wrapping up the "before and after" series I started earlier this year.  I'll definitely be sharing the remaining spaces...at some point!!  Hehe.

Friday, August 7, 2015

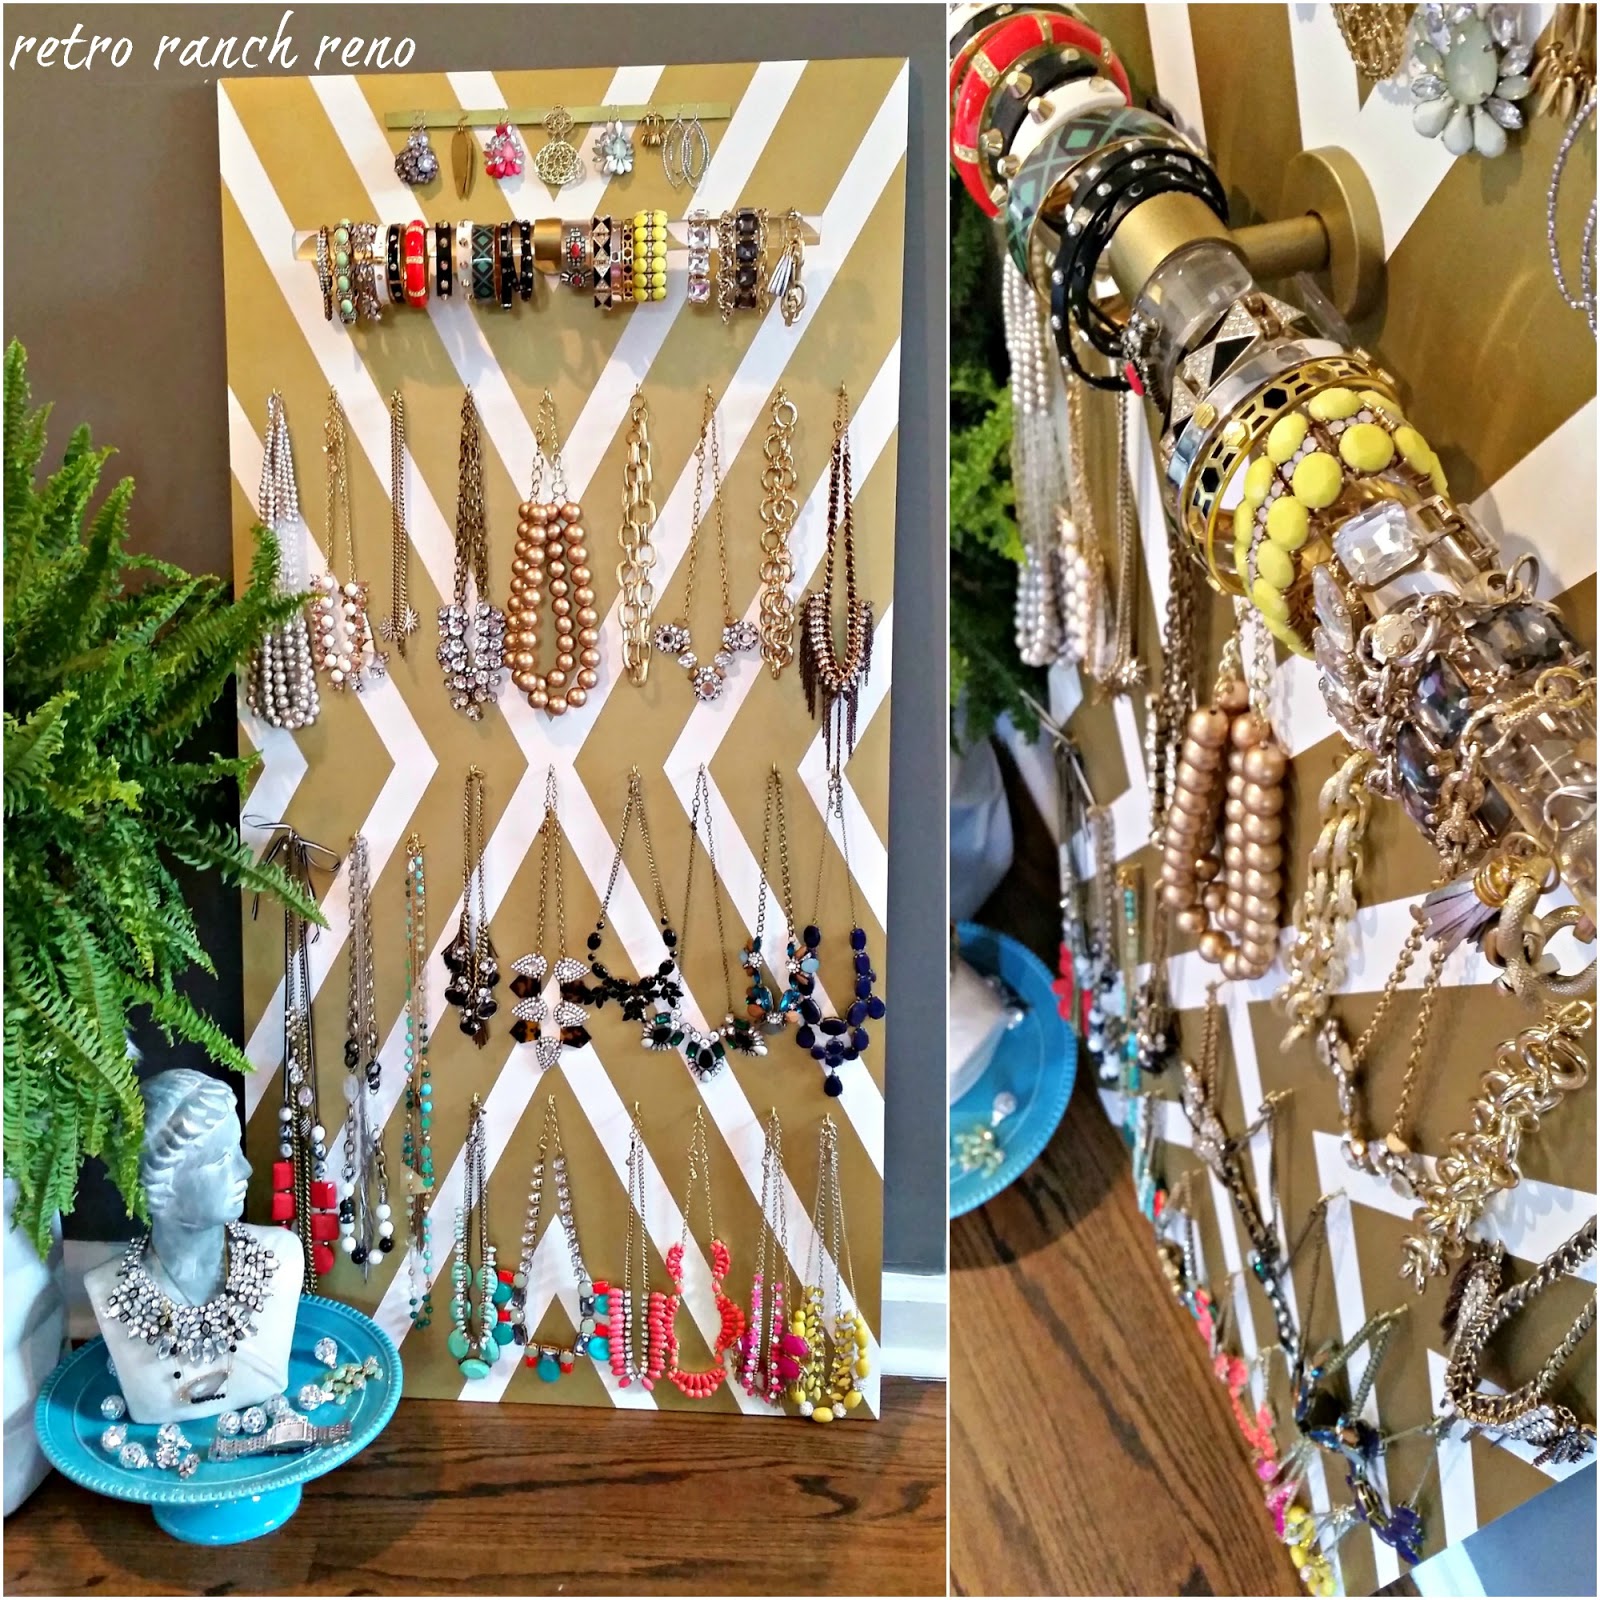
DIY Jewelry Organizer - Tutorial.


I really shouldn't even call this post a "tutorial".  A couple people asked how I created my jewelry organizer, and I'm more than happy to share...but please don't be surprised that I winged whole project!!


Step 1: Buy a piece of MDF from Home Depot.

Step 2: Spray paint it with my favorite spray primer as I was priming a few other projects.

Step 3: After it's dry, let it lean up against your master bedroom wall for over a year while you put the project off.

Step 4: Keep your beloved jewelry in a massive pile on a tray in your bedroom.

Step 5: Get super fed up contending with a jumbled jewelry mess every day.

Step 6: Untangle all your necklaces and sort based on similar styles/lengths.

Step 7: Lay jewelry out on the MDF and play around until you like the placement.

Step 8: Get out tape measure and pretend like you are going to use it.

Step 9: Forget said tape measure and decide to just eyeball the placement.  Using a ballpoint pen, mark the spot where you need to drill pilot holes for the cup hooks you will later screw in.

Step 10: Drill pilot holes.

Step 11: Find a leftover gallon of white satin paint in the basement and apply two coats.  Allow to dry overnight.

Step 12: Get out your painters tape and start winging a design.  Decide you don't need to use a tape measure here either...just your eyeballs and a couple widths of tape will do.

Step 13: Get out the X-Acto knife and remove superfluous pieces of tape in your design.

Step 14: Whine like a big baby because being bent over doing all that taping hurt your back like no other.  Then suck it up and paint the white paint over your design to minimize bleed through.

Step 15: Use your favorite gold spray paint to paint to coat your design, the cup hooks, curtain rod bracket and metal strip you will later attach.

Step 16: Remove the painters tape while the paint is fairly wet so nothing rips the paint off.

Step 17: Hate your project because there are paint splatters all over that you didn't notice while spraying, but are VERY obvious now that it's dry. (Note - do not spray paint in the evening light.)

Step 18: Attach cup hooks and hang some necklaces while praying it looks a little better.

Step 18a: That didn't work so attach bracelet bar and earring holder hoping they'll distract from the ugly splatters.  Nope, still ugly.

Step 18b: Throw yourself a mini-pity party.

Step 18c: Use the non-tape-measure method and drill more pilot holes into your board because more necklaces hanging = less ugly board showing.  You will definitely like the project then.  WRONG.

Step 19: Wave the white flag and realize you need to start back at step 12...re-tape/re-cut out your design.

Step 20: Spray paint another coat, or two, of paint over your project...and now fall in love.

Step 21: Remove the tape while the spray paint is still semi-wet.

Step 22: Touch up any small areas where the white paint lifted with the tape.

Step 23: Spray a matte clear coat over the whole board to protect your project that you now love. Also, spray your hooks, curtain rod bracket and metal strip for the earrings.

Step 24: Reattach cup hooks, bracelet bar and earring holder

Step 25: Arrange your jewelry in a way that makes your heart happy, and thank the Lord this project can be crossed off your to-do list!!!

Optional step-

Step 26: Wonder how long it will take you to actually hang it on the wall instead of just leaning it up against the wall.


PS-the bracelet bar is made out of left over materials from my DIY lucite curtain rods, and the earring holder is made from a metal strip I picked up at the hardware store.  I simply drilled 3 screws halfway into the board, dabbed some gorilla glue onto each screw and positioned the metal strip on top.  Then I secured the strip in place with painters tape while the glue dried.

Thursday, May 28, 2015

Our Rancher: Before & After - The Guest/Hall Bath.

This before and after is a little tough to illustrate.  Our former hall/guest bath was tight.  The doorway was narrow...the vanity was too big for the space.  It was from the 1950's and not comfortable to use.

Our master bath was even worse.  It was also original to the house, much smaller, had a sink too small to ever wash your face in, the shower was leaking...and, well, I'm pretty sure you could be sitting on the toilet AND washing your hands at the same time.

So yay for having two bathrooms (we previously only had one), but booooooooo that neither worked for us.  Thankfully, they backed up to each other, and were right next to a master bedroom closet.

Here is the floorplan before:


Legend:
(1) – Stairs to the Basement
(2) – Hallway Coat Closet
(3) – Linen Closet #1
(4) – Linen Closet #2
(5) – Main Bath
(6) – Master Bath
(7) – Bedroom #1 Closet
(8) – Bedroom #2 Closet
(9) – Bedroom #3 Closet
(10) – Master Bedroom Closet #1
(11) – Master Bedroom Closet #2

And here is it is after we combined the two bathrooms and stole a little bit of master bedroom closet #1:

Legend:
(1) – Stairs to the Basement
(2) – Hallway Coat Closet
(3) – Linen Closet #1
(4) – Linen Closet #2
(5) – Main Bath
(6) – Bedroom #1 Closet
(7) – Bedroom #2 Closet
(8) – My Closet (Master Bedroom Closet #1)
(9) – Hubby’s Closet (Master Bedroom Closet #2)
(10) – Master Bathroom
(11) – Master Bedroom Closet #3

Hopefully those explanations and floor plans can help you visualize the transformation below.  And considering our renovations were done on a tight budget, I think this bath turned out great!!

Bye-bye 1950's....


I love how spacious this bathroom is now!

Make sure you're all caught up with our before and after posts here: the intro, part one, two, three, four, five and six!


Friday, May 15, 2015

Our Rancher: Before & After - The Hallway.

I'm sure some of you are thinking that a hallway does not deserve it's own "before and after" post...especially in our humble ranch.  In many homes, they are merely a walkway to get from point A to point B.  And while that is true, our view has changed quite a bit from when we signed on the dotted line.

Removing a few walls, adding some pot lights and a stencil (or two) has definitely improved our modest hall.  I still have manyyy picture frames to hang here before I can call this "complete", but it's getting there.


Not too bad, huh?  I can't wait to share our guest bedrooms and bath!

And catch up on the rest of the "then and now" series with these links...the intro, part one, two, three, four and five!

Monday, May 11, 2015

Our Rancher: Before & After - The Fireplace.

At first glance, you'd think our fireplace was hopeless.  It was like the rest of our house...depressing, drab and outdated.  I was just thankful to have a fireplace and knew, with a little effort, it wouldn't be so bad!

Truth be told, I'm hoping this isn't a true "after" for you guys.  I dream of installing a gas insert, and maybe a bit more trim.  It's already become one of my favorite focal points in our great room, but I know in my heart it can get even better!!

With a little paint and a lot of courage (to tackle my first tiling job), our fireplace went from bleh to beautiful!


Don't forget to check out the intro, part one, two, three and four of our rancher "before and after" series! Next up is our hallway...aka my stenciled labor of love. ;)

Thursday, May 7, 2015

Our Rancher: Before & After - The Kitchen.

Sorry for the mini-break I took to reveal my DIY jewelry organizer...but it's back to the before and afters! (Insert round of applause here.)

This series has been a blast to put together!  I hope you guys are enjoying it too.  If you've missed the intro, part one, part two or part three, make sure you catch up!

Now it's time to show how our dark, closed-off kitchen became a bright light in our home.  I may have mentioned before that I'm so ready to overhaul our 1954 cabinets...but until we a) hit the lottery, or b) save up the funds, I, at least, have a pretty kitchen to look at. ;)

Our kitchen hasn't changed a whole lot since I revealed the renovation, right after we moved in,so here's a little refresher...

We couldn't afford a new kitchen, so I made it look as new as possible.  We painted the cabinets, added new hardware, ripped out the linoleum and continued hardwoods throughout. We removed the restaurant booth (yes, I said restaurant booth) and used the cabinet from the back side of it to create an island.  We also added lighting, new appliances, a new backsplash and countertops.  It made a world of difference, and I couldn't believe how great our 1954 kitchen looked.


What do you think...should we have just kept the old look?! ;)