Friday, December 30, 2011

Dining Chair Re-Do

After the hubby and I found our house, I immediately began the hunt for some furniture to fill our home.  Most of our old furniture from the townhouse stayed with the townhouse after the sale.  The girl who purchased our old home was buying her very first place.  She didn't have much money to furnish things, and since she loved how I decorated the home, we offered to include most of our furniture in the sale.  {Plus, our townhouse was way smaller than the home we purchased, so the scale of the furniture would have been off.}

And I know it takes years to furnish a home.  There is no way we could buy everything to fill our place up, but I wanted to, at least, have the basics when we moved in.  We are definitely on a very tight budget, so I knew that what I did buy, couldn't all be new {nor did I want it to be...I really like re-purposing old stuff}.

I had a pretty clear idea of what my dining set would look like.  I wanted a chunky, straight-leg harvest table...with a leaf...that was made from solid wood.  I didn't mind spending some money on it because I look at it as an investment that will last through the years.  I found one online, for a decent price, and even scored 10% off.  Getting a solid wood table that opens to seat 10-12 people for under $1,000 was a major score for me.

And since I spent so much money on the table, I knew I'd be searching through Craigslist for the chairs to go with it.  I came across these chairs...a set of 6 {with 2 captain's chairs}, for $100.  Sold. 


Then I found two more chairs in a separate listing, that don't completely match, but are very similar for an additional $20.  Sold again! {I already sanded one, and removed the cushions at this point.}


So I ended up with 8 chairs for $120.

I did have to buy sand paper, primer, paint and fabric to transform them, but still...such a great deal for solid wood chairs in great shape!  Similar dining chairs could cost $120 or more just a pair!
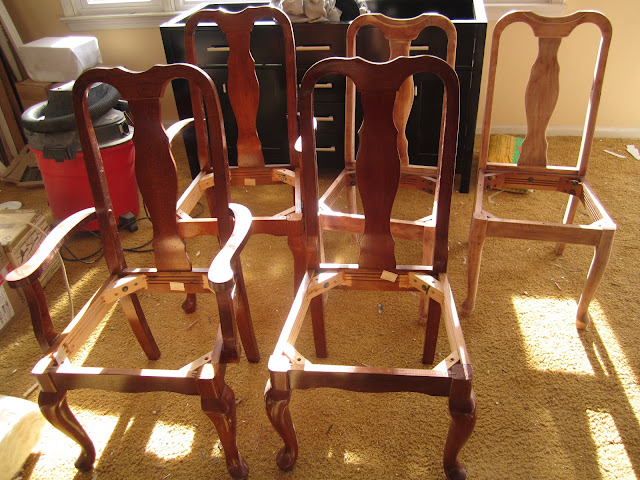
Cushions all removed and sanding done on the back two chairs.
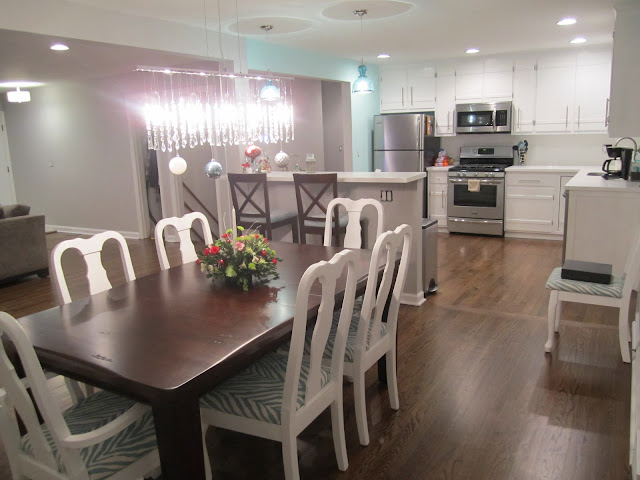
So after lots of sanding/de-glossing, priming, painting, staple removing {me and my Mom's hands still aren't back to normal...aka we have perma-claw-hand} and re-covering...the chairs now look like this.  Not too shabby!!


What do you think?!?  I hope you enjoyed their transformation as much as I did!

Happy New Year!!

Thursday, December 29, 2011

Freshened Up Fireplace

After a couple coats of paint and some metallic spray paint, our fireplace has gone from majorly drab...


...to awesomely fab!!  Okay, maybe it's not all the way there...yet.  Once we can re-tile the hearth, I'll be 110% head-over-heels for our fireplace!

Wednesday, December 28, 2011

Let's Catch Up...

I’m going to start off by saying I am so very sorry about being totally MIA for the past week-and-a-half-ish.  The hubby and I took a “staycation” from work the week of the 19th through the 23rd so that we could pack up, move, unpack and complete as many house projects as possible.  We needed to be ready for my sister, her husband, and my nephew to arrive on Christmas day.  The days were long and exhausting.  We started at 7 something each morning and went until after midnight most nights.  {If I could sleep for a week straight, I probably would.}  Between me, the hubby and my beyonddd amazing parents, we got a lot accomplished, and weirdly, had a ton of fun while doing it.

We packed up our stuff from the in-laws on the 17th…and moved everything into the basement of our house that same morning.  We had the help of Pete’s dad {who is a master at packing a moving truck}, my parents and some great friends {thanks Justin, Matt and Maria}.  Without all of them, the day would have been much longer and more difficult.

Packing up our room at the in-laws.
Some of our stuff jammed into the basement...along with the hubby testing out his Christmas lights.
More of our stuff, and our awesome lawn chairs we used to relax on in the basement haha.

Unfortunately, we had to keep all of our stuff in the basement until our floors were completed.  They started sanding them on the 15th and finished the last coat of sealer in the evening on the 19th.  That meant we couldn’t get on the floors until the after dinner on the 20th. 

Floors, before.
And again.
After the stain went down, buffing the floors.
He was clearly weirded out by me taking pictures of the process from the basement stairs haha. 
Buffed and ready to be sealed.
And again.
Fresh coat of sealer.
Couldn't wait for them to be dry!
Finished product.
In love.
While the floors were being done, and with all of our stuff in the basement, and no access to our main living space...we were restricted to what we could accomplish around the house.  Luckily, during that lull we were able to find a phenomenal garage door guy to replace the horrendous doors that were on our house.  We called him on Saturday night to see if we could get an estimate…he met us early the next morning…and put the doors on all day Monday.  He was $500 less than our contractor’s bid, and we couldn’t have asked for more from him.  {I highly recommend him in case anyone needs garage doors in North Jersey!!}

Remember these??

View of the old garage doors from the outside.
View from the inside.
So awful.
Well now our garage looks a little more like this...thank gosh!

View from the inside.
Other door.
View from the outside...new key pad too.
Other door.
Much better than the old, green doors!! And our pretty wreath!
Once dinner was over on Tuesday, we rolled out the red carpet rosin paper, and started protecting our floors.  Then it was time to clean the major dust that was covering every square inch of our house.  The next days were filled with putting together our baby 55” LED TV {me and the hubby’s sort-of Christmas present to each other…we purchased it during a killer Black Friday deal, online…no, we didn’t brave the crazy crowds out there}, 3 beds, a TV stand, dining room table, painting trim, caulking everywhere, refinishing dining room chairs, refinishing night stands, painting cabinets, installing cabinet hardware, painting the fireplace, recovering dining room chairs/bar stools, etc.

Around midnight on Christmas Eve I even managed to put up our little tree, stockings and a couple other decorations.  I know it isn’t anything to brag about, but it wasn’t too awful considering I was half asleep, and I couldn’t even find everything I needed {aka - there is no tree skirt, I rigged up a tree topper, etc.}. 

It's the best I could do for this year.
Strung ornaments up on our chandelier.
Merry Christmas!
The hubby was also hard at work during the week trying to put some lights up outside.  It was a major struggle since the electricians still haven't installed our exterior outlet and we have no bushes since we ripped everything out at the end of the summer.  But hey, we worked with what we had…and I think it looks cute!


By Christmas the house was semi-in-order…and I stress semi!  {We were even unpacking boxes as I heard my sister and her husband coming into the house.  And there are still a ton of boxes to go through in the basement.}  So we took a break from slaving away on the house to enjoy a nice holiday with my family.  

And I promise, there are many more pictures and details of the house to come.  Now that we are no longer spending every waking minute working on the house, and we have a functioning computer back, I’ll be able to catch you all up on the changes in our casa.  I can’t wait to share it all.  Hope everyone had a wonderful holiday!  :)

Thursday, December 15, 2011

One Last Look...

Today is a big day.  Our floors are getting some much needed TLC.  I stopped at the house after work last night to make sure everything was moved off the hardwoods and to take a few “before” pictures...you know, so we could remember how awful our floors used to be. ;)

It was crazy to see how open our house looked {minus the fridge in the dining room} because we’ve had so many boxes, random furniture projects, supplies and tools all over our living area for months now.

{Warning: my camera flash was NOT cooperating with me during these pictures…so most of them are entirely too yellow and don’t show the true colors of the house. :(  My apologies…and, I promise I’ll try harder next time.}

View from in the kitchen. {Yes, I know we need to paint all the drawers still.}

And again.

One last time.

View from the living room.  {Yup, those are outdoor porch chairs that have served as seating in our house thus far.  Hey, we gotta work with what we got haha.}

Another shot.

View from the dining room towards the kitchen.

And again.

One last time.

View from the fireplace down the hallway to the bedrooms.

And into the kitchen.  {The bar counter supports are only primed...they need to be painted to match the wall color still.}

View from the hallway towards the living area.

Hallway corner towards guest bedroom #2 and the master bedroom.

Horrible lighting, but view into the master bedroom.

Our awesome new fandelier (chandelier + ceiling fan).

Such a pretty glow.

Another shot, with the high hat lights turned off.

Lighting is still not right in this picture.

This is the best depiction of the true wall color.

And back to bad lighting in my pictures.  Grrrrrrrrr.

View from master bath towards the master bedroom.

Some master bath lovin'....just because I love how it's turning out.

Towel bars.

Master shower...just needs some glass!

All shower trim is now installed.

Our shiny, new faucets.

Guest bedroom #2 with fan/light installed and paint colors on the walls.  {We taped off our vents for when the floors get sanded.  We already had our air ducts cleaned, and we didn't want to have to do it again.}

The floor of my closet....old and new hardwoods.
I really can't wait to see what kind of impact the newly stained floors make in our home!   I can't wait to share some "after" pictures!